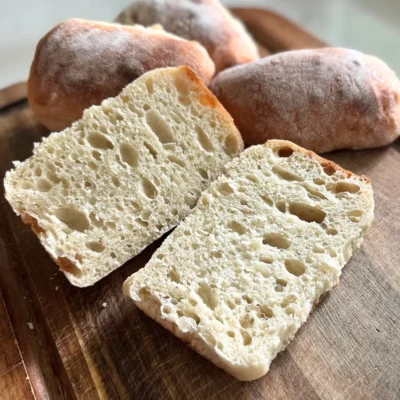
These homemade potato flake sourdough ciabatta rolls have a beautifully rustic, flour-dusted crust with a chewy interior full of those irregular air pockets that make ciabatta bread so good.
Traditional ciabatta is known for being a wet, sticky dough, and this potato flake sourdough version is no different! It may feel a little different from other potato flake sourdough breads you have made, but don’t let the sticky dough scare you.
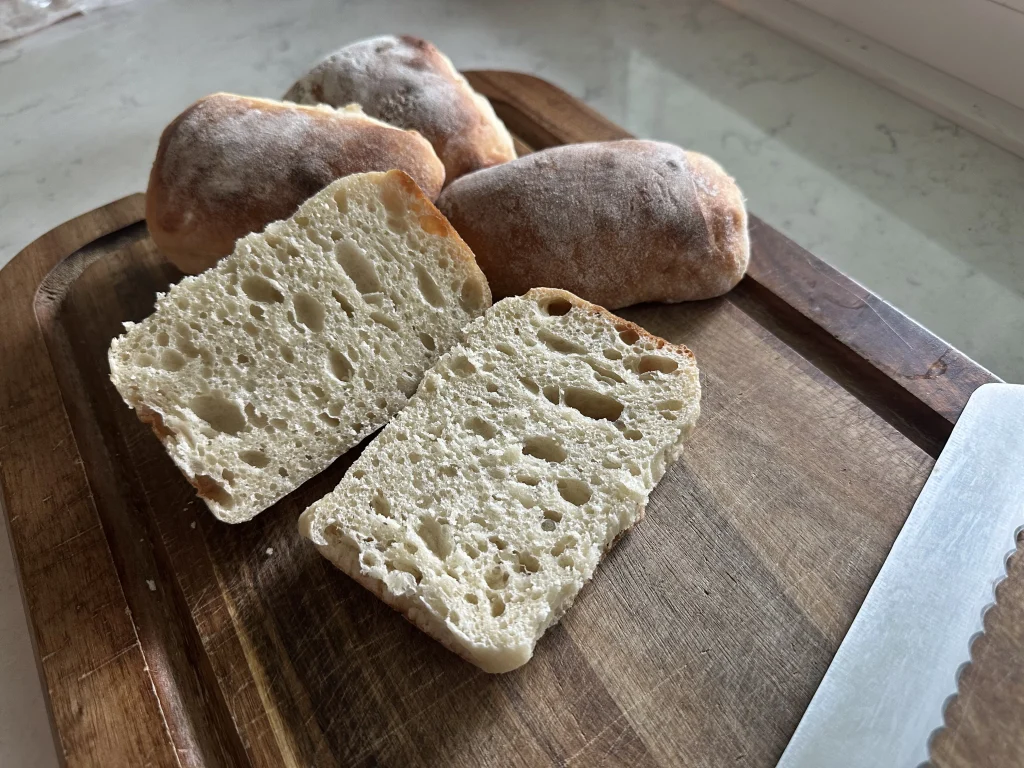
The wet dough, stretch-and-fold process, and long fermentation are what help create that classic chewy texture and open crumb.
You can divide this recipe into 8 larger rectangular rolls that are perfect for sandwiches or 12 smaller square rolls for smaller sandwiches, sliders, or serving alongside a meal.
This recipe does require a little planning ahead because it is made over approximately two days, but most of that time is completely hands-off while the dough rests and ferments.
If you are new to potato flake sourdough, you may want to start with my Potato Flake Sourdough Starter: Everything You Need to Know post. Potato flake sourdough is different from a traditional flour-and-water starter, but once you get the hang of it, it is incredibly easy to keep and use!
This post may contain affiliate links through Amazon, which means I may make a small commission at no extra cost to you. When you make a purchase through my link, you help me keep Little Tennessee Home up and running. Thank you so much for your support! See my amazon associate full disclosure here.
Why You’ll Love This Potato Flake Sourdough Ciabatta Bread
I love finding new ways to use my potato flake sourdough starter, and these ciabatta rolls are such a fun change from a traditional loaf of sourdough bread.
The crust is lightly crisp and flour-dusted while the inside stays chewy and full of irregular air pockets.
A few more reasons I love this recipe:
- No commercial yeast is needed. The potato flake sourdough starter provides the yeast needed to ferment and rise the dough.
- Most of the preparation is hands-off. There are several rests and fermentation periods, but the actual hands-on work is pretty simple.
- There is very little traditional kneading. Stretch-and-folds strengthen the dough instead.
- They make great sandwich rolls. The 8-roll version is especially good for sandwiches.
- They freeze well. Bake a batch and save some for later.
- Rustic is a good thing! You don’t need perfectly shaped rolls for this recipe.
What Is Potato Flake Sourdough?
Potato flake sourdough is made using a sourdough starter that is fed with instant potato flakes, sugar, and water.
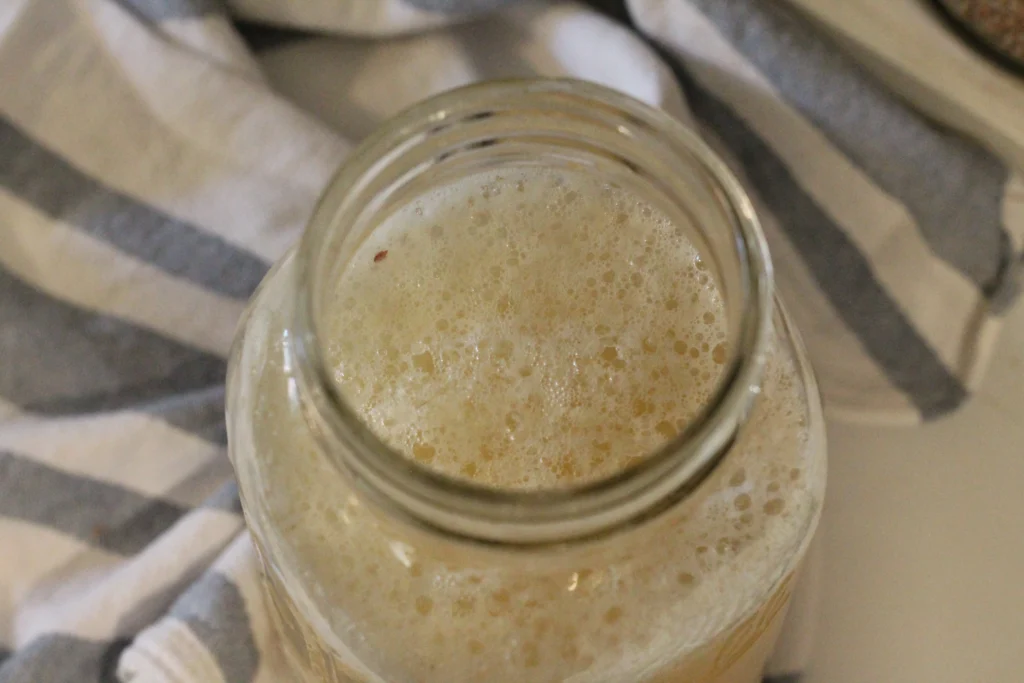
Unlike a traditional flour-and-water starter, potato flake sourdough starter is thinner and has a slightly sweeter flavor.
For this recipe, you want to use an active potato flake sourdough starter.
The starter is actually used twice in this recipe.
First, a portion is mixed with flour to create a preferment that ferments for 8–24 hours.
Then active potato flake starter is added again when the final ciabatta dough is mixed.
What Makes Ciabatta Different?
If you have made some of my other potato flake sourdough recipes, the first thing you will probably notice is that this dough feels much wetter and stickier.
That’s exactly how it should be!
Ciabatta traditionally has a high-hydration dough. That extra moisture helps create the open, airy interior and chewy texture that ciabatta is known for.
Because the dough is so sticky, you don’t want to keep adding flour to the dough while mixing just to make it easier to handle.
Instead, use lightly oiled hands during the stretch-and-fold process and plenty of flour on the outside of the dough when it is time to shape.
This post may contain affiliate links, which means I may make a small commission at no extra cost to you. When you make a purchase through my link, you help me to keep Little Tennessee Home up and running! Thank you for your support! See my full disclosure here.
Tools You Will Need
- Large mixing bowl
- Kitchen scale
- Measuring cups and spoons
- Silicone spatula or wooden spoon
- Plastic wrap, reusable bowl cover, or beeswax wrap
- Bench scraper
- Parchment paper
- Baking sheet or baking stone
- Pizza peel, optional but very helpful
- Metal roasting pan, cast-iron skillet, or rimmed metal baking sheet for creating steam
- Instant-read thermometer
- Cooling rack
A bench scraper is especially helpful when working with ciabatta dough.
Because the dough is so sticky, I almost think of the bench scraper as an extension of my hands. It makes it much easier to divide the dough into rolls and gently straighten the edges without overhandling it.
A pizza peel is also really helpful when it is time to transfer the proofed rolls into the oven, especially if you are using a baking stone.
Ingredients
Bread Flour
Bread flour gives ciabatta its wonderfully chewy texture and helps the wet dough develop enough strength to hold those beautiful air pockets.
For the best results, I recommend using bread flour or freshly milled flour with 2 tablespoons of vital wheat gluten.
You will need:
- 1 cup flour (130g) for the preferment
- 2 1/2 cups flour (325g) for the final dough
- Additional flour for shaping
You can substitute all-purpose flour 1:1 if needed.
If you have vital wheat gluten, I recommend adding approximately 2 tablespoons when using all-purpose flour to increase the protein.
Without the vital wheat gluten, the dough may not be quite as strong and may have a harder time holding its shape.
Freshly milled flour can also be used.
Active Potato Flake Sourdough Starter
You will need active potato flake sourdough starter in both the preferment and the final dough.
You will need:
- 2/3 cup active potato flake starter for the preferment
- 1/2 cup active potato flake starter for the final dough
Make sure your starter has recently been fed and is active before beginning the recipe.
Warm Water
You will need 1/2 cup (120g/ml) warm water.
I like the water to be around 100°F.
It should feel warm but not hot.
Salt
You will need 1 1/2 teaspoons (8g) table salt.
Unlike many bread recipes where all of the ingredients are mixed together at the beginning, the salt is added after the dough has rested for 30 minutes.
It is incorporated during the first set of stretch-and-folds.
Olive Oil
You only need a small amount of olive oil for coating your hands or spatula.
It makes working with this sticky dough much easier without requiring you to add additional flour directly into the dough.
How to Make Potato Flake Sourdough Ciabatta Bread
Make the Preferment
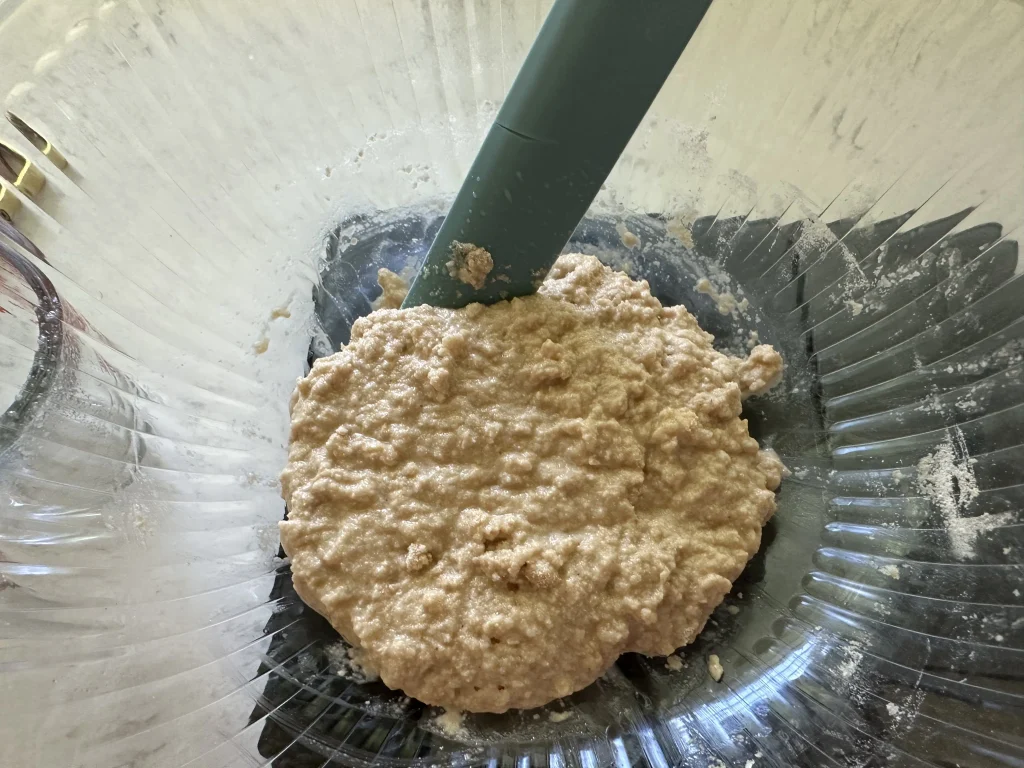
Add 1 cup (130g) bread flour or freshly milled flour and 2/3 cup active potato flake sourdough starter to a large mixing bowl.
Mix together using a silicone spatula until completely combined, scrape down the sides of the bowl to keep the dough all together.
Cover the large bowl tightly with plastic wrap or a air-tight reusable bowl cover.
Allow the preferment to sit at room temperature for 8–24 hours.
After fermenting, the preferment may appear fluffy and active.
It may increase significantly in size, but it may or may not completely double.
Mix the Ciabatta Dough
After the preferment has fermented for 8–24 hours, uncover the bowl.
Add:
- 1/2 cup warm water
- 1/2 cup active potato flake sourdough starter
- 2 1/2 cups bread flour
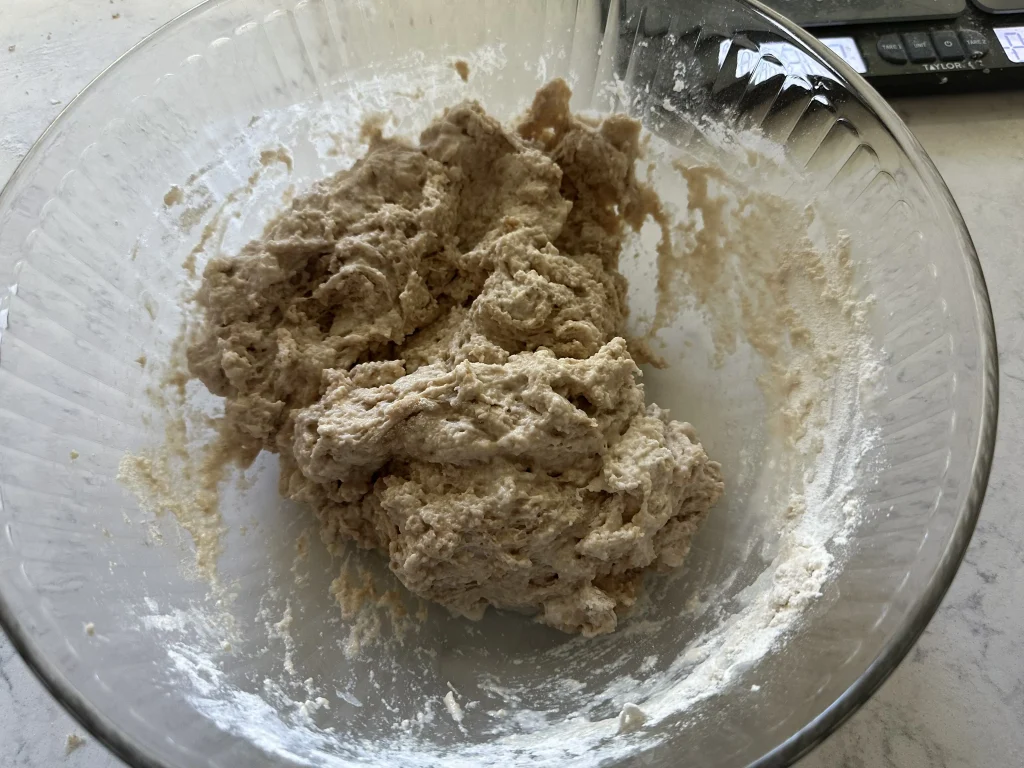
Gently mix everything together with a silicone spatula or wooden spoon.
At first, the dough may seem dry and shaggy in some areas.
Keep working it until all of the flour has been moistened and there are no dry pockets remaining.
If needed, lightly grease your hands with olive oil and gently work the ingredients together directly in the bowl.
The finished dough should be wet and sticky.
That is completely normal for ciabatta!
Let the Dough Rest
Cover the bowl and allow the dough to rest at room temperature for 30 minutes.
Do not add the salt yet.
Add the Salt and Complete the First Stretch-and-Fold
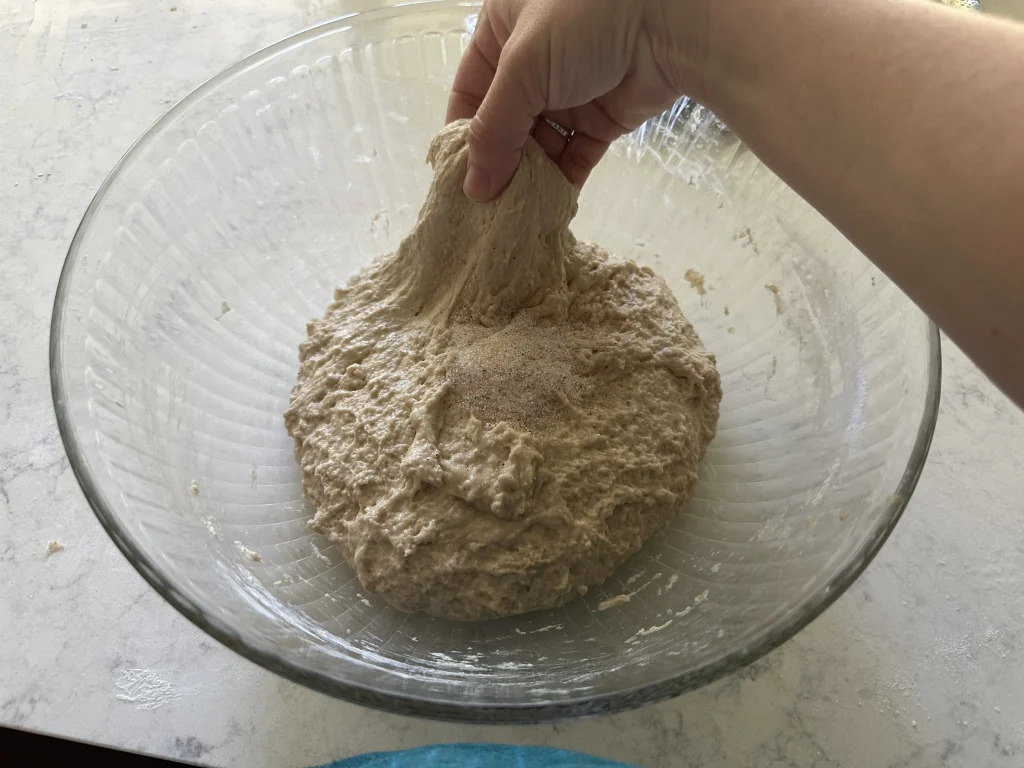
After the dough has rested for 30 minutes, add the 1 1/2 teaspoons (8g) salt.
You will work the salt into the dough while completing your first set of stretch-and-folds.
Lightly coat your hands with olive oil or use a wet hand.
Imagine that your bowl is a clock.
Grab the dough at the 12 o’clock position, gently stretch it upward, and fold it over the dough toward the 6 o’clock position.
Turn the bowl a quarter turn and repeat.
Continue working your way around the bowl.
Go around the bowl twice for a total of approximately 8 folds.
As you stretch and fold the dough, work the salt into it as evenly as possible.
Cover the bowl and allow the dough to rest for another 30 minutes.
Complete the Remaining Stretch-and-Folds
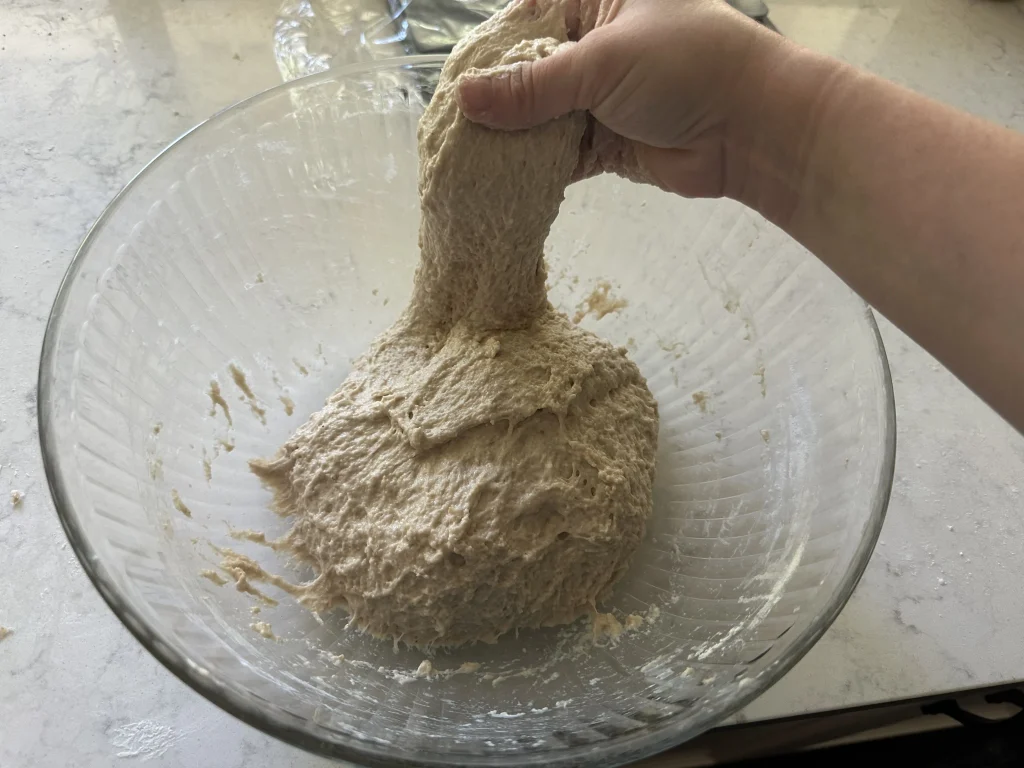
Repeat the same stretch-and-fold process three more times.
Allow the dough to rest for 30 minutes between each set (this amount of time doesn’t have to be exact, just approximate).
You will complete a total of four sets of stretch-and-folds.
The dough should gradually begin to feel stronger and more elastic as you work through the sets.
Allow the Dough to Ferment
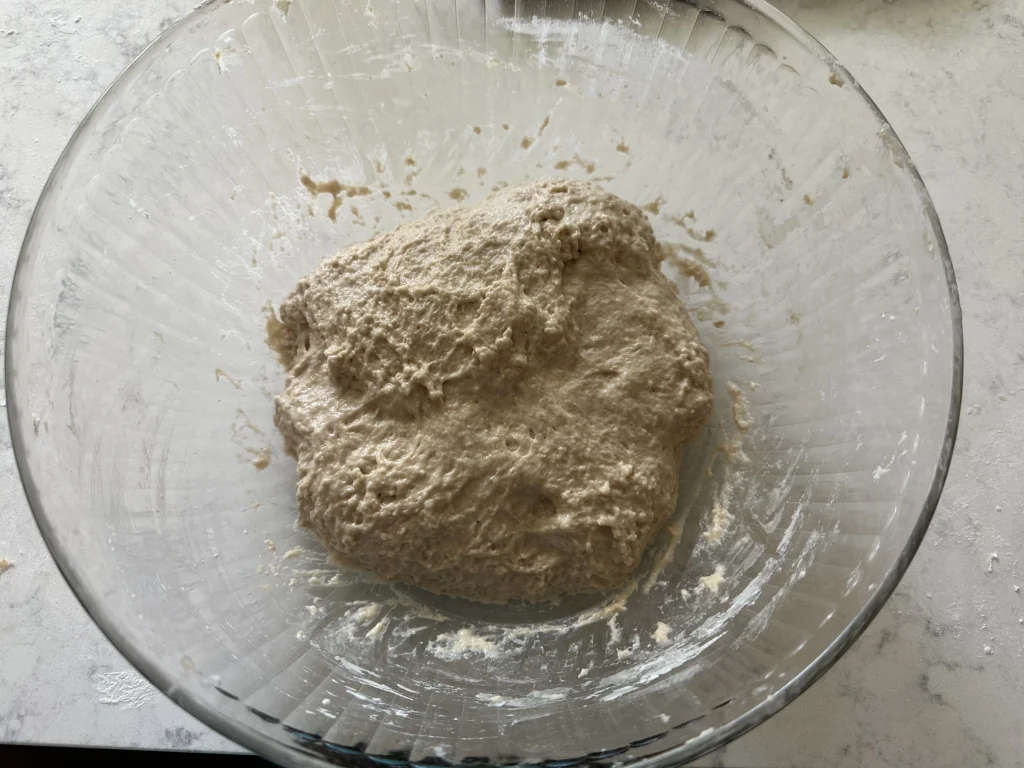
After completing the fourth and final stretch-and-fold you will have a smooth dough ball, cover the bowl tightly with plastic wrap.
Allow the dough to start the first rise at room temperature for approximately 4–5 hours.
Then transfer the covered bowl to the refrigerator.
Refrigerate the dough for at least 10 hours and up to 24 hours.
This long bulk fermentation helps develop the flavor and texture of the ciabatta.
Prepare the Dough for Shaping
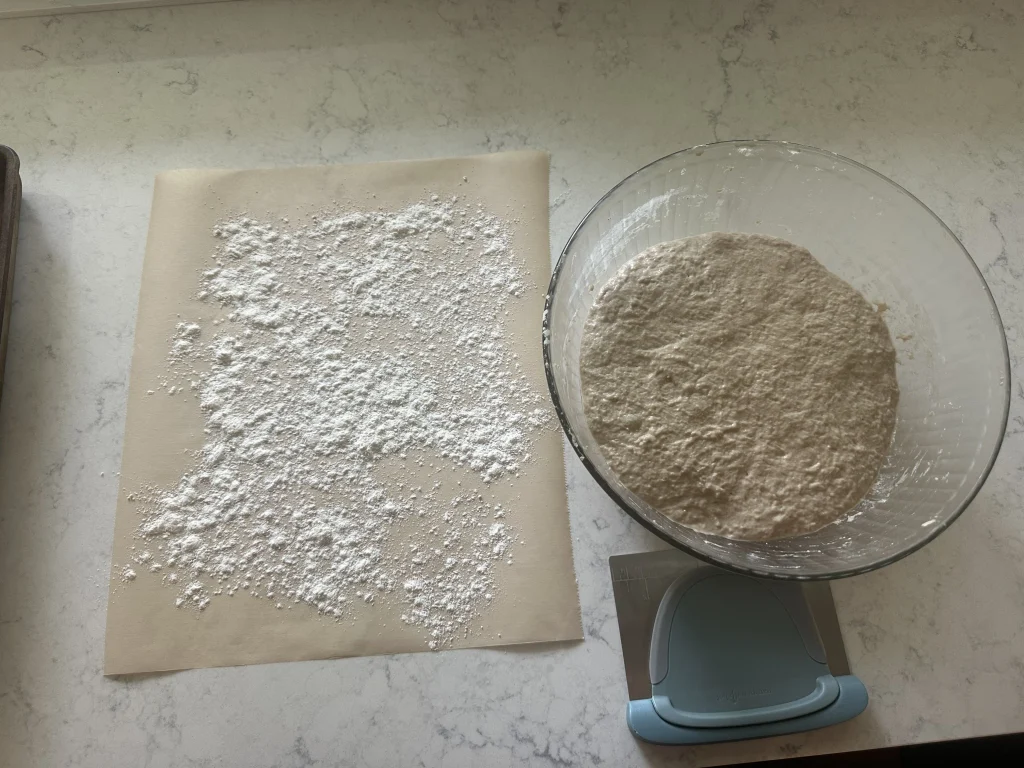
After the extended fermentation, lay out a piece of parchment paper that will fit onto your baking sheet or baking stone.
Generously flour the parchment paper.
And when I say generously, I mean it!
Ciabatta dough is sticky, and this is not the time to be shy with the flour.
Using lightly oiled hands or a lightly oiled silicone spatula, gently scrape the dough out of the bowl and onto the floured parchment paper.
Generously sprinkle flour over the top of the dough as well.
Shape the Ciabatta Dough
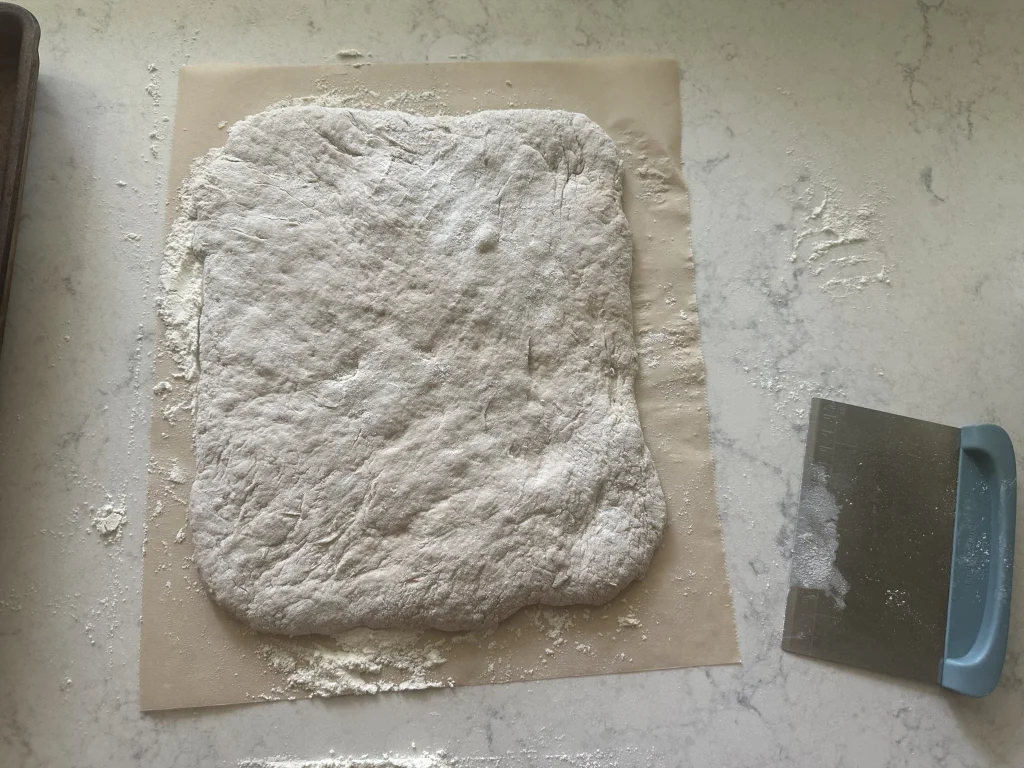
Using floured hands, gently stretch and shape the dough into a rough rectangle approximately 10×7 inches.
Try not to press down hard on the dough.
You want to preserve as many of those bubbles created during fermentation as possible.
The rectangle does not have to be perfect.
Ciabatta is supposed to look rustic!
Cut Into 8 Rectangle Rolls
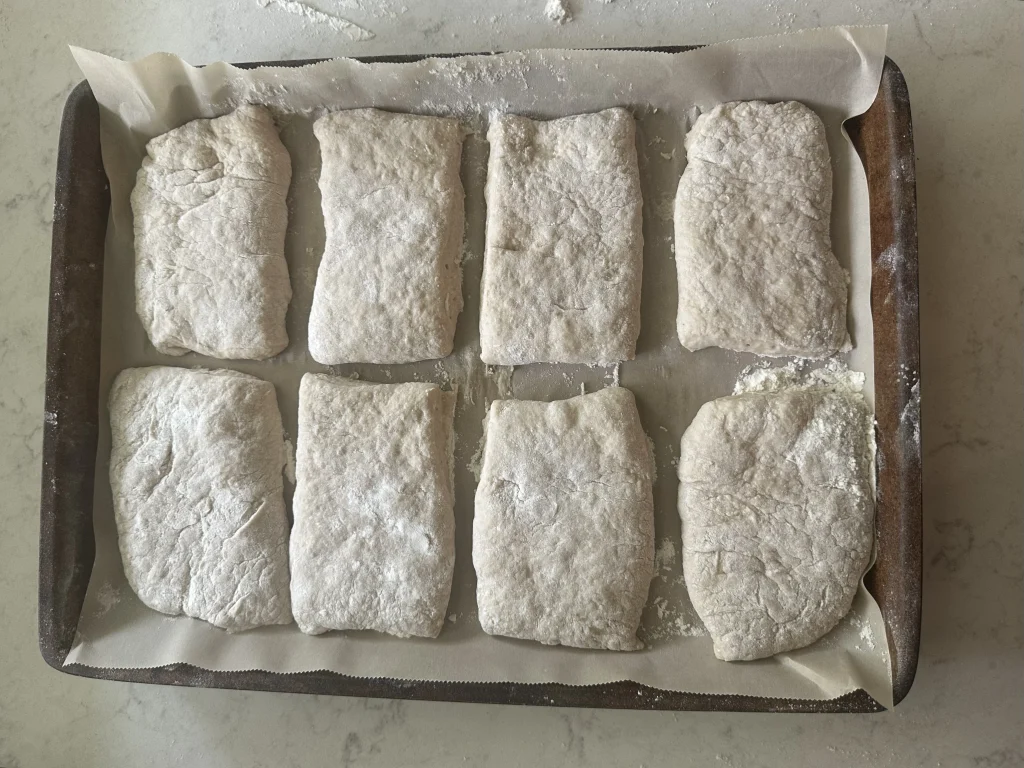
For larger sandwich-style rolls, use a floured bench scraper to divide dough into 8 roughly equal rectangles.
Each roll will be approximately 2.5×3.5 inches, although they do not have to be exact.
OR Cut Into 12 Square Rolls
For smaller rolls, divide the dough into 12 roughly equal pieces.
An easy way to do this is to cut the rectangle into a 3×4 grid.
Again, don’t worry if your pieces are not perfectly square or exactly the same size.
Arrange the Rolls
Gently arrange the cut rolls at least 2 inches apart on the parchment paper.
Handle them carefully so you don’t significantly deflate the dough.
If one gets a little misshapen while you move it, use floured hands or your bench scraper to gently straighten it.
But don’t overwork them trying to make them perfect.
Those slightly uneven shapes are part of homemade ciabatta’s rustic look.
Proof the Ciabatta Rolls
Lightly sprinkle flour over the tops of the shaped rolls.
Gently cover them with a clean kitchen towel or another piece of parchment paper if you have any concern of flies or gnats, cover with plastic wrap.
Allow the rolls to proof for their short second rise at room temperature for 3 hours.
Preheat the Oven and Baking Surface
Approximately 40 minutes before you are ready to bake, position one oven rack on the lowest level and another rack in the center of the oven.
Place a flat cookie sheet, rimmed baking sheet, or baking stone on the center rack.
I personally prefer using my baking stone.
Preheat the oven to 450°F.
You want the oven AND your baking surface to be thoroughly heated before the ciabatta goes in.
Create Steam in the Oven
When you are ready to bake, place several cups of ice cubes into a large shallow metal roasting pan, cast-iron skillet, or rimmed metal baking sheet.
The pan of ice will go on the bottom oven rack while the bread bakes.
Do not use a glass dish!
Adding ice to extremely hot glass can cause it to crack or shatter.
Transfer the Ciabatta Rolls to the Oven
Uncover the proofed rolls.
If desired, lightly spray or flick a little water over the tops of the rolls.
This is optional, but the additional moisture helps create even more steam and can give you a crispier crust.
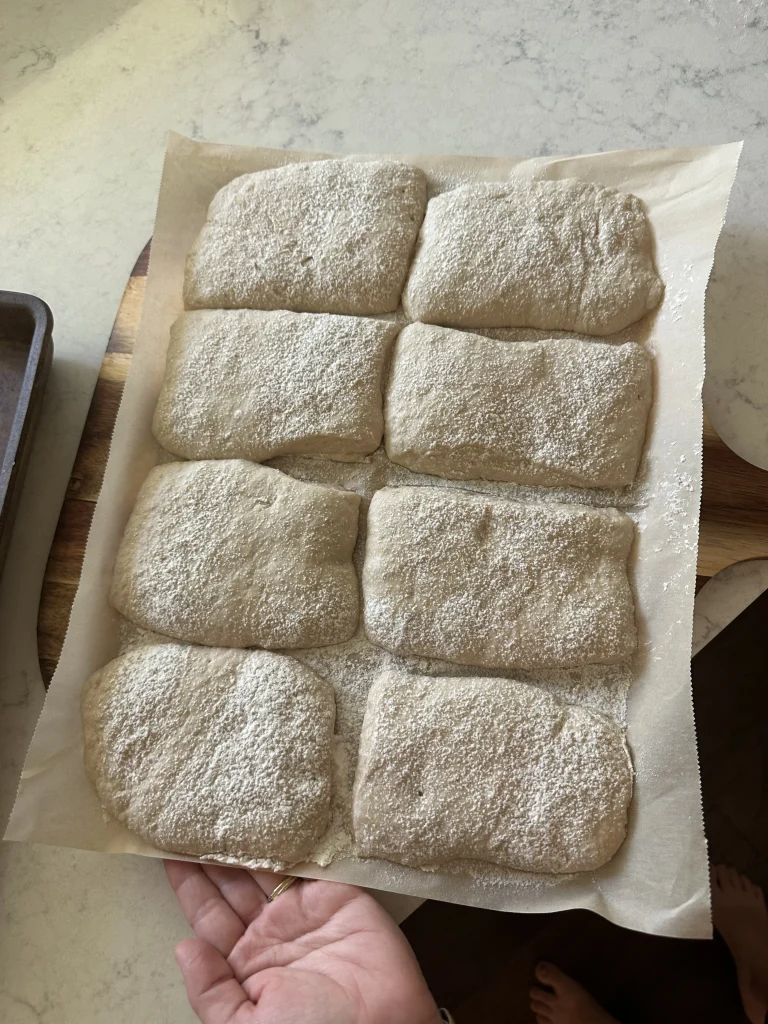
Working quickly, carefully remove your preheated baking sheet from the oven and slide the parchment paper containing the rolls onto it.
Return the baking sheet to the center rack.
If you have a pizza peel, this is a perfect time to use it.
I like to place parchment paper with the rolls on it and then use the pizza peel to quickly slide the entire piece of parchment onto the hot baking surface.
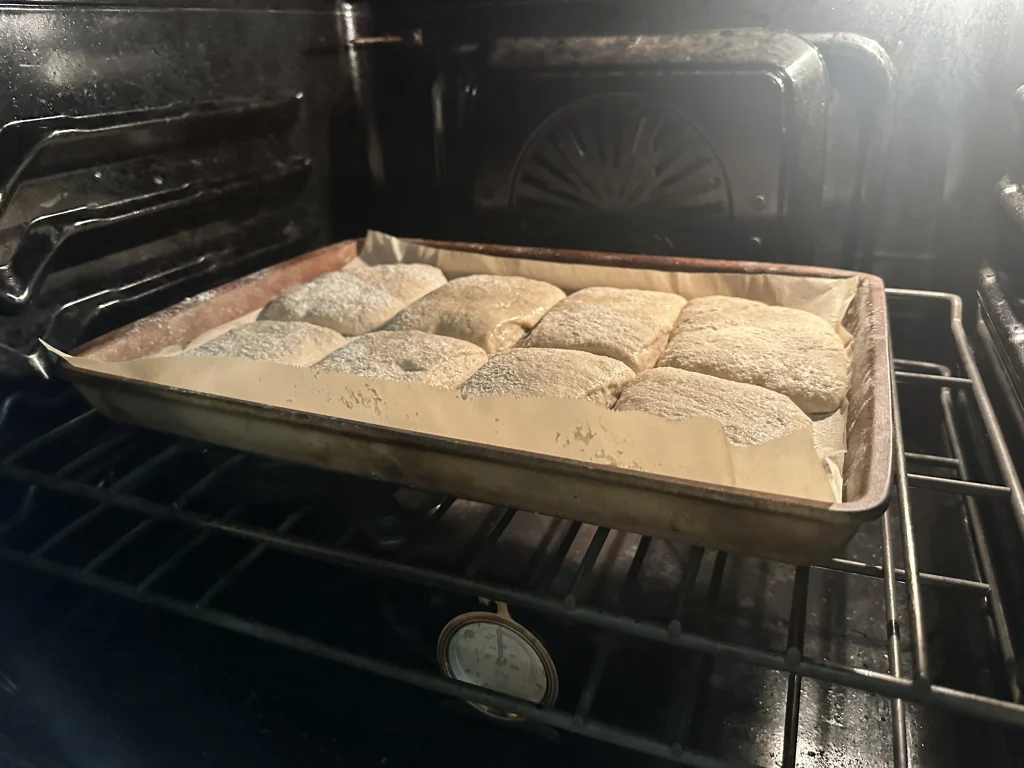
If you work quickly, you can do this without even removing your baking stone or baking sheet from the oven.
Place the pan containing the ice on the bottom rack and quickly close the oven door to trap the steam inside.
Bake the Ciabatta Rolls
Bake at 450°F for approximately 20–22 minutes, or until the rolls are golden brown.
If you prefer a deeper golden color, they may need to increase the cooking time to 25 minutes.
You can gently tap the bread to check for doneness.
The rolls should sound hollow.
For a more accurate test, insert an instant-read thermometer into the center of one roll.
The internal temperature should be approximately 200–205°F.
Cool Before Cutting
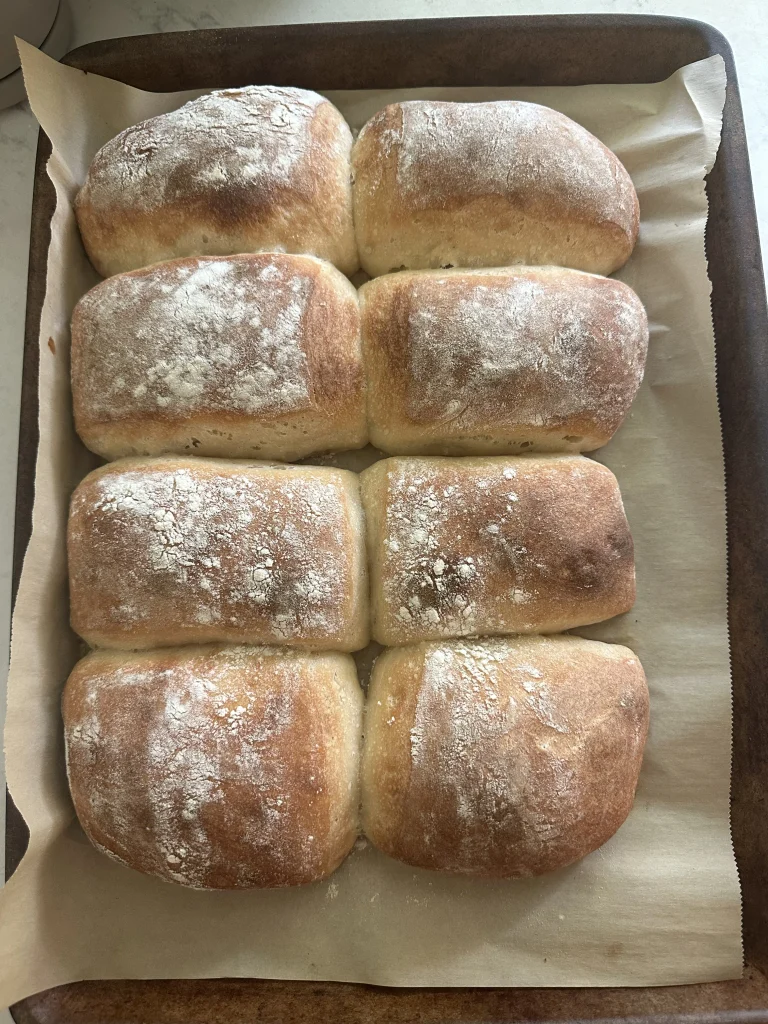
Remove the baked rolls from the oven and transfer them to a cooling rack.
Allow them to cool for at least 45 minutes before slicing.
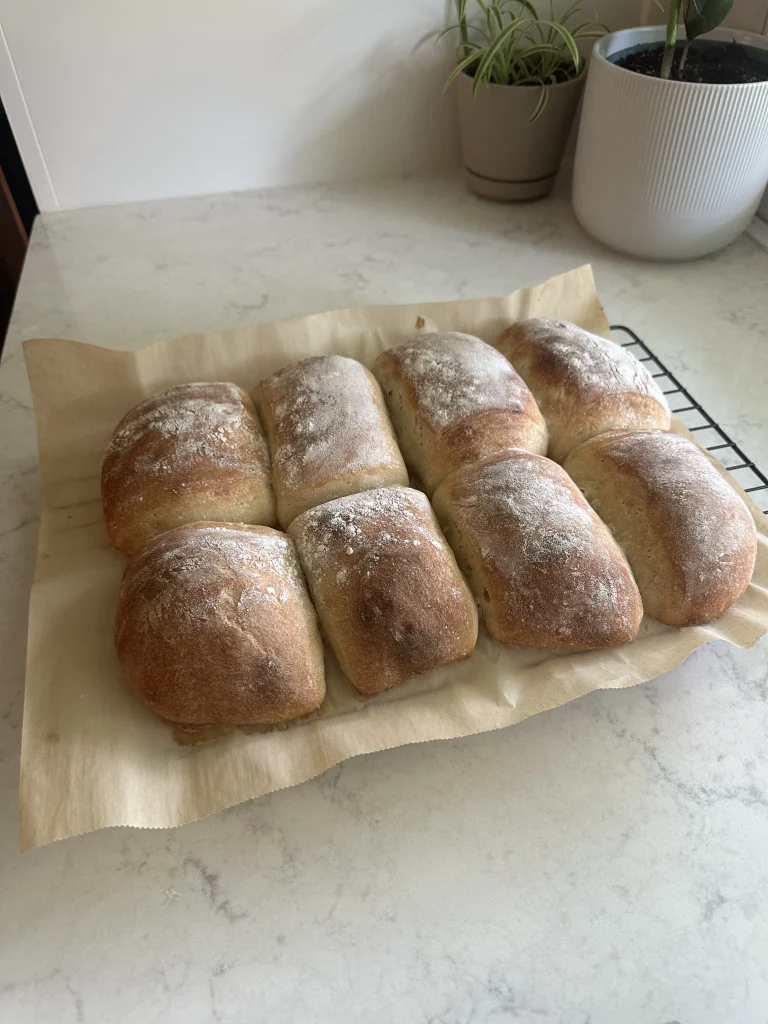
I know it is hard to wait when you have freshly baked bread sitting on the counter, but this step is important!
If you slice the bread while it is still very hot, the inside can become gummy.
Why Is My Ciabatta Dough So Sticky?
If your first thought while making this recipe is, Surely this needs more flour, you probably aren’t alone!
Ciabatta dough is supposed to be very sticky.
The higher hydration is what helps create the irregular holes and chewy interior associated with ciabatta bread.
Instead of adding a lot of extra flour to the dough itself, lightly oil your hands during the stretch-and-folds.
Once it is time to shape the rolls, you can be much more generous with flour on the parchment paper, your hands, your bench scraper, and the outside of the dough.
Do I Have to Use a Bench Scraper?
No, but I highly recommend one.
Because ciabatta dough is so wet and sticky, a bench scraper makes dividing and moving the dough much easier.
You can use a sharp knife if that is what you have available, but try to make clean cuts instead of dragging the knife through the dough and pulling out the air.
Can I Use All-Purpose Flour?
Yes.
You can substitute all-purpose flour for bread flour at a 1:1 ratio without making any other changes to the recipe.
However, bread flour has a higher protein content, which helps give this wet dough more strength and contributes to the chewy texture.
If you use all-purpose flour and have vital wheat gluten available, add approximately 2 tablespoons to increase the protein content.
Without vital wheat gluten, the dough may not be quite as strong and may spread a little more.
Why Use Steam When Baking Ciabatta?
Steam helps create the crispy crust we want on ciabatta.
The moisture inside the oven keeps the outside of the dough from setting too quickly during the first part of baking.
That gives the rolls more time to expand before the crust becomes firm.
The steam also helps create that crisp, rustic exterior.
I use a pan of ice on the lower oven rack because it is an easy way to create steam at home.
Can I Use a Baking Stone?
Yes!
In fact, I prefer using my baking stone for these rolls.
Place the stone on the middle oven rack and allow it to preheat with the oven for approximately 40 minutes.
When you’re ready to bake, use a pizza peel to transfer the parchment paper and proofed rolls directly onto the hot stone.
How Do I Know When Ciabatta Is Done?
The outside of the rolls should be golden brown and should sound hollow when gently tapped.
For the most accurate method, check the internal temperature with an instant-read thermometer.
The center should reach approximately 200–205°F.
Storage
Room Temperature
Store leftover ciabatta loosely covered at room temperature for up to 5 days.
I don’t recommend sealing freshly baked crusty bread too tightly because it can soften the crust.
Refrigerator
The rolls can also be stored in the refrigerator for up to 1 week.
For the best texture, warm them briefly before serving.
How to Freeze Potato Flake Sourdough Ciabatta
These rolls freeze really well!
Bake the ciabatta according to the recipe and allow the rolls to cool completely.
Transfer them to a freezer-safe bag or airtight freezer container.
Freeze for up to 3 months.
Allow the rolls to thaw at room temperature before serving.
You can warm them briefly in the oven after thawing if you want to freshen up the crust.
Ways to Use Potato Flake Sourdough Ciabatta Rolls
These rolls are delicious warm with butter, but they are especially good for sandwiches because of their chewy texture.
Try using them for:
- Ham and cheese sandwiches
- Turkey sandwiches
- Italian sandwiches
- BBQ Chicken sandwiches
- Breakfast sandwiches (I love making a copycat Starbucks sandwich)
- Pulled pork
- Paninis
- Soup and sandwich meals
- Dipping in seasoned olive oil
- Serving alongside pasta
The 8-roll version works especially well when you want a larger sandwich bun.
The 12-roll version makes smaller square rolls that are great for smaller sandwiches or serving alongside dinner.
Tips for the Best Potato Flake Sourdough Ciabatta
Use an active starter. Your potato flake sourdough starter is providing the wild yeast for this entire recipe, so make sure it is active before getting started.
Don’t try to turn this into a dry dough. Sticky is normal!
Oil your hands for stretch-and-folds. This makes the wet dough much easier to handle.
Flour generously when shaping. You don’t want to add unnecessary flour into the dough itself, but you can use plenty on the outside once it is time to shape.
Handle the fermented dough gently. You worked hard to create those bubbles. Don’t press them all out!
Don’t worry about perfect rolls. Ciabatta should look rustic.
Preheat your baking surface. A hot baking sheet or baking stone helps create a better crust.
Don’t skip the cooling time. Allow the bread to cool for at least 45 minutes before cutting so the crumb can finish setting.
More Potato Flake Sourdough Recipes
If you enjoyed making these potato flake sourdough ciabatta rolls, you may also enjoy:
- Potato Flake Sourdough Bread
- Potato Flake Sourdough Dinner Rolls
- Potato Flake Sourdough Crescent Rolls
- Potato Flake Sourdough Hot Dog Buns
- Potato Flake Sourdough Pizza Crust
- Potato Flake Sourdough Sausage and Cheese Kolaches
These potato flake sourdough ciabatta rolls are definitely a little different from a traditional loaf of potato flake sourdough bread, but that’s what makes them so fun to make!
The sticky dough and long fermentation give you a wonderfully chewy interior with those beautiful air pockets, while the steam in the oven helps create that rustic, lightly crisp crust.
If you give this recipe a try, I would greatly appreciate it if you came back and gave it a 5-star review! It helps me so much!
I also love seeing all of the delicious creations you make! Share your photo over on Instagram or Facebook and give me a tag @littletennesseehome.
Potato Flake Sourdough Ciabatta Bread
Equipment
- Large mixing bowl
- measuring cups and spoons
- Kitchen scale
- Silicone spatula or wooden spoon
- Bench scraper
- Parchment Paper
- Baking sheet or baking stone
- Pizza peel, optional
- Metal pan or cast-iron skillet for steam
- Instant-read thermometer
- Cooling Rack
Ingredients
Preferment
- 1 cup 130g bread flour or freshly milled flour
- 2/3 cup active potato flake sourdough starter
Ciabatta Rolls
- 1/2 cup 120g/ml warm water, approximately 100°F
- 1/2 cup active potato flake sourdough starter
- 2 1/2 cups 325g bread flour, plus more as needed for shaping
- 1 1/2 teaspoons 8g table salt
- Olive oil as needed for coating hands and spatula
Instructions
- Add 1 cup bread flour and 2/3 cup active potato flake sourdough starter to a large mixing bowl. Mix with a silicone spatula until combined.
- Cover tightly and allow the preferment to rest at room temperature for 8–24 hours. It may become fluffy and increase in size, but it may or may not double.
- After the preferment has fermented, add 1/2 cup warm water, 1/2 cup active potato flake sourdough starter, and 2 1/2 cups bread flour.
- Gently mix with a silicone spatula or wooden spoon until all of the flour has been moistened and no dry pockets remain. If needed, lightly oil your hands and gently work the dough together in the bowl. The dough should be wet and sticky.
- Cover and allow the dough to rest for 30 minutes.
- Add 1 1/2 teaspoons salt during the first set of stretch-and-folds. With lightly oiled hands, stretch one side of the dough upward and fold it over to the opposite side. Rotate the bowl 90 degrees and repeat. Continue until you have gone around the bowl twice, for approximately 8 folds.
- Cover and rest for 30 minutes.
- Repeat the stretch-and-fold process three more times, resting the dough for 30 minutes between each set. Complete a total of four sets of stretch-and-folds.
- After the final stretch-and-fold, cover the dough and allow it to ferment at room temperature for approximately 4–5 hours.
- Transfer the covered dough to the refrigerator for at least 10 hours and up to 24 hours.
- After the extended fermentation, lay out a piece of parchment paper that will fit your baking sheet or baking stone and generously flour it.
- Using lightly oiled hands or a lightly oiled spatula, gently scrape the dough onto the floured parchment. Generously flour the top of the dough.
- Using floured hands, gently stretch the dough into a rough 10×7-inch rectangle, being careful not to significantly deflate it.
- For 8 rectangular rolls, use a floured bench scraper to divide the dough into 8 approximately equal pieces, roughly 2.5×3.5 inches each.
- For 12 smaller square rolls, divide the dough into 12 approximately equal pieces using a 3×4 grid.
- Arrange the rolls at least 2 inches apart on the parchment paper. Handle them gently and avoid pressing out the air.
- Lightly sprinkle flour over the rolls and gently cover with a clean kitchen towel or parchment paper.
- Allow the shaped rolls to proof at room temperature for 3 hours.
- Approximately 40 minutes before baking, position one oven rack on the lowest level and another in the center. Place a baking sheet or baking stone on the center rack and preheat the oven to 450°F.
- When ready to bake, place several cups of ice in a shallow metal roasting pan, cast-iron skillet, or rimmed metal baking sheet. Do not use glass.
- Uncover the rolls. If desired, lightly spray or flick the tops with a little water for additional steam.
- Working quickly, transfer the parchment paper and proofed rolls onto the preheated baking sheet or baking stone. A pizza peel makes this especially easy.
- Place the pan of ice on the bottom oven rack and quickly close the oven door to trap the steam.
- Bake at 450°F for 20–22 minutes, or until golden brown. Bake up to approximately 25 minutes for a deeper golden color.
- The finished rolls should sound hollow when tapped. For a more accurate test, the internal temperature should reach approximately 200–205°F.
- Transfer the rolls to a cooling rack and allow them to cool for at least 45 minutes before slicing.