

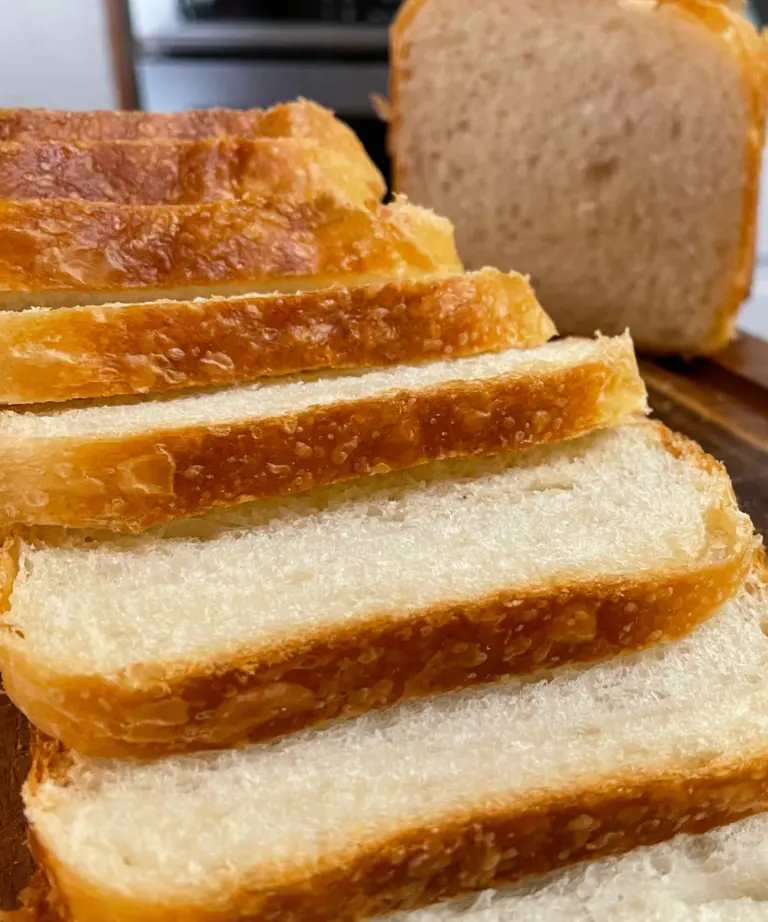
A Pullman loaf pan is perfect for baking a beautifully square, soft-crusted sandwich bread. If you love making homemade sourdough bread, this potato flake sourdough version will become a staple in your kitchen. The natural fermentation from the potato flake sourdough starter gives it a delicious flavor and tender crumb, making it ideal for sandwiches, toast, or even French toast.

Why Use a Pullman Loaf Pan?
A Pullman loaf pan is a rectangular bread pan with a lid that creates a square-shaped loaf. This shape is perfect for uniform slices, making it ideal for sandwich loaves. The lid also helps control the dough rise, resulting in a soft, even texture. Additionally, the straight sides of the Pullman pan contribute to the light and airy interior while maintaining a structured crust.
The lidded pan was originally designed for Pullman railway cars to maximize storage efficiency. Today, home bakers appreciate this unique baking method for creating the perfect sandwich loaf of bread. You can use this type of pan with the lid on or off, depending on what type of sandwich bread style you prefer.
This post may contain affiliate links through amazon, which means I may make a small commission at no extra cost to you. When you make a purchase through my link, you help me to keep Little Tennessee Home up and running! Thank you for your support! See my full disclosure here.
Tools you will need:
USA Bakeware Pullman loaf pan
Kitchen aid stand mixer (optional, but makes the process easier)
Measuring cups and spoons
Plastic wrap or beeswax wrap
Digital thermometer (optional, but allows you to check for doneness)
Ingredients
- Active potato flake sourdough starter
- Warm water (around 90°F-100°F)
- Sugar or honey
- Olive oil, melted butter, or coconut oil,
- Salt
- Bread flour
Pullman Loaf Pan Bread Instructions
Feed Your Starter

Make sure your potato flake sourdough starter is bubbly and active before baking. Feed it 8–24 hours before you plan to mix the dough to ensure it’s ready. A strong, active starter is essential for getting a good rise in your loaf. If your starter has been stored in the fridge, let it come to room temperature before using.
If you are new to working with a potato flake starter, it differs slightly from a traditional flour-based sourdough starter. It is fed with sugar, warm water, and instant potato flakes, resulting in a mild and slightly sweet fermentation process. Because of this, potato flake starters tend to create a softer and more tender crumb than traditional sourdough.
You can convert a traditional sourdough starter into a potato flake sourdough starter. It’s super simple and so easy!
Mix the Dough
In a large mixing bowl or stand mixer, combine the active starter, warm water, sugar (or honey), oil (or melted butter), flour and salt. If mixing by hand, stir with a wooden spoon until until a soft dough forms.
Using high-quality bread flour can make a difference in the structure of your loaf. Bread flour has a higher protein content than all purpose flour, which contributes to the development of gluten. If using all-purpose flour, you may need to knead a little bit longer to achieve the same elasticity.
Knead the Dough
Knead the dough for about 8–10 minutes by hand on a lightly floured surface or 5–7 minutes in a stand mixer with a dough hook. The dough should be smooth, slightly tacky, and elastic. Proper kneading helps develop gluten, which gives the bread its structure and chewiness.
The dough should not be overly sticky on your hands. You might have a small amount of residue that sticks to your fingers, but it should be very easy to manage. If it is too sticky, add a small amount of flour at a time until you are able to handle it easier.
First Rise

Place the dough in a greased bowl, cover it with plastic wrap, and let it rise in a warm place for 4–6 hours, or until doubled in size. The rise time can vary depending on the temperature of your home and the activity of your starter.
If your first rise is about done, but you don’t want to shape it yet, you can refrigerate the dough in a covered bowl. This slows down the fermentation process and can even help the final product be easier to digest.
Shape the Loaf

Lightly coat the Pullman loaf pan with cooking spray. (even though it is nonstick, I prefer to lightly oil my pan.) Once risen, gently deflate the dough and using your hands press to flatten the dough and shape it into a rectangle just a bit wider than the Pullman loaf pan. Be careful not to overwork the dough, as this can lead to a denser texture. Roll it tightly while maintaining even tension to create a uniform shape.


When shaping, use the base of your palm to press the dough into itself helping close up each seem. Finally, pinching the seem at the end and placing seem down into the pan.
If using a standard loaf pan instead of a Pullman pan, you can still follow the same process, but the shape of your final bread after baking will be more domed rather than square.
Second Rise


Cover the pan with plastic wrap and let the dough rise for another 6-12 hours, or until it reaches about 1/2 inch below the top edge of the pan. If the dough rises too much, it may overflow during baking, so keeping an eye on this final proof is important.
TIP: Use plastic wrap to help you see the progress of your dough. If you look at the photo above, I used the lid as my cover, but it rose to the lid and when I pulled it open to look, it deflated it some. I didn’t notice that the dough had risen so much because I couldn’t see in. Now I use plastic wrap during the rise so I can see when I need to add the lid and bake.
For a more structured rise, place the pan in a slightly warm environment (about 75°F to 80°F). Too cold, and the dough may take much longer to rise; too warm, and it may overproof and collapse.
Bake the Bread
Preheat your oven to 350°F. Place the lid on the Pullman loaf pan and bake for 35–40 minutes. If you prefer a golden crust, remove the lid during the last 5 minutes of cooking time.

Using an instant-read thermometer, check for an internal temperature of about 190–200°F (88–93°C) to ensure the loaf is fully baked. If the loaf is underbaked, it may be gummy inside.
Cool and Slice
Once baked, remove the loaf from the pan and let it cool completely on a wire rack before slicing. This ensures the texture stays light and fluffy. Cutting too soon can cause the loaf to dry out more quickly because of allowing the moisture to escape from the bread.

For cleaner slices, use a serrated knife and slice with a gentle sawing motion. It also helps to have a bread slicing guide or an electric knife that helps prevent squishing the bread when slicing. Store the loaf in an airtight container for up to 5 days or freeze for longer storage.
Additional Tips for Making Potato Flake Sourdough Bread in a Pullman Loaf Pan:
- Use an active starter: This ensures a proper rise and good texture.
- Be patient with fermentation: Sourdough takes longer to rise than commercial yeast bread, so allow ample time.
- Maintain proper hydration: Too much flour can make the dough dense; aim for a slightly tacky feel.
- Experiment with flavors: Try adding seeds, herbs, or a touch of honey for variations.
- Whole wheat version: Use half whole wheat and half bread flour for a wheat version.
Frequently Asked questions:
Potato Flake Sourdough Bread in a Pullman Loaf Pan-How is this recipe different?
This recipe is adapted from my original potato flake sourdough recipe. I have adjusted the measurements so that it provides the perfect amount of dough for this size pan. It is essentially the same recipe, just adjusted for the pan size. The original recipe calls for using 3 bread pans. That much dough would rise way too much for this pan and give you a dense loaf.
What is special about a Pullman loaf pan?
The Pullman loaf pan is designed to create a square, uniform loaf, making it ideal for sandwich bread. The straight sides and lid contribute to a fine crumb texture and soft crust. The pan is amazingly nonstick and as long as it is cared for properly, you will not ever have to worry about a loaf of bread sticking in the pan again.

What can I use if I don’t have a Pullman loaf pan?
If you don’t have a USA Pan Bakeware Pullman loaf pan, you can use a another brand of loaf pan. While the shape will be different and may not turn out exactly the same, you can still bake a delicious sandwich loaf. I found some large bread pans that will work as a more affordable option, however, I highly suggest putting the USA Pullman loaf pan on your Christmas list, it’s worth waiting for!
Why are Pullman pans so expensive?
Pullman pans are typically made from high-quality, heavy-duty materials with a specialized lid. Their durability and ability to create professional-quality loaves contribute to their higher cost. While it might be hard to dish out more money on a bread pan. Once you use it, you will completely understand its worth. I’m a pretty frugal gal so it took me awhile to finally make the purchase myself, but I sure do wish I would have gotten it sooner!
What is the purpose of the lid on a Pullman loaf pan?
The lid creates an even rise, giving the bread its characteristic square shape. It also traps moisture, resulting in a soft crust and uniform texture. For some reason, loaves of bread like to get air pockets right beneath the top crust during baking. This can be SUPER frustrating after working so hard on a loaf. Using the lid on these pullman pans help prevent this from happening!

How many slices of bread can I get out of the large pullman pan?
Obviously, this can vary depending on the thickness of the slices but on average you can expect to get about 20 slices of bread from this recipe in a large pullman loaf pan.
This potato flake sourdough bread in pullman loaf pan is a wonderful way to create a soft, sandwich-friendly bread with natural fermentation benefits. Whether you use it for morning toast, lunchtime sandwiches, or even French toast, this soft classic bread loaf is a delightful addition to your bread recipes!
Pin for later and share with a friend

If you give this recipe a try, I would greatly appreciate if you came back and gave it a 5-star review! It helps me out so much!
I also love seeing all of the delicious creations you make! Share your own photo of your potato flake sourdough bread in pullman loaf pan over on instagram and give me a tag @littletennesseehome

Use my link to get 20% off your first year of using plan to eat! Not only do you get an amazing meal planning tool, but you also will get access to ALL of my recipes from the blog on your meal planning app. PLUS you will gain additional access to exclusive personal recipes not found on the blog! Learn all about the app in my video!

Potato Flake Sourdough Bread in a Pullman Loaf Pan
Equipment
- USA Bakeware Pullman loaf pan
- Kitchen aid stand mixer (optional, but makes the process easier)
- measuring cups and spoons
- Plastic Wrap or Beeswax Wrap
- Digital thermometer (optional, but allows you to check for doneness)
Ingredients
- 2/3 cup active potato flake sourdough starter
- 1 cup warm water around 90°F-100°F
- 1/4 cup sugar or 2 Tablespoons honey
- 5 tablespoons Mild Olive oil can also use coconut oil or melted butter
- 2 teaspoons salt
- 4 cups of bread flour
Instructions
- Make sure your potato flake sourdough starter is bubbly and active before baking. Feed it 8–24 hours before you plan to mix the dough to ensure it’s ready. A strong, active starter is essential for getting a good rise in your loaf. If your starter has been stored in the fridge, let it come to room temperature before using.
- In a large mixing bowl or stand mixer, combine the active starter, warm water, sugar (or honey), oil (or melted butter), flour and salt. If mixing by hand, stir with a wooden spoon until until a soft dough forms.
- Knead the dough for about 8–10 minutes by hand on a lightly floured surface or 5–7 minutes in a stand mixer with a dough hook. The dough should be smooth, slightly tacky, and elastic. Proper kneading helps develop gluten, which gives the bread its structure and chewiness.
- The dough should not be overly sticky on your hands. You might have a small amount of residue that sticks to your fingers, but it should be very easy to manage. If it is too sticky, add a small amount of flour at a time until you are able to handle it easier.
- Place the dough in a greased bowl, cover it with plastic wrap, and let it rise in a warm place for 4–6 hours, or until doubled in size. The rise time can vary depending on the temperature of your home and the activity of your starter.
- Lightly coat the Pullman loaf pan with cooking spray. (even though it is nonstick, I prefer to lightly oil my pan.) Once risen, gently deflate the dough and using your hands press to flatten the dough and shape it into a rectangle just a bit wider than the Pullman loaf pan. Be careful not to overwork the dough, as this can lead to a denser texture. Roll it tightly while maintaining even tension to create a uniform shape.
- When shaping, use the base of your palm to press the dough into itself helping close up each seem. Finally, pinching the seem at the end and placing seem down into the pan.
- Cover the pan with plastic wrap and let the dough rise for another 6-12 hours, or until it reaches about 1/2 inch below the top edge of the pan. If the dough rises too much, it may overflow during baking, so keeping an eye on this final proof is important.
- Once risen, preheat your oven to 350°F. Place the lid on the Pullman loaf pan and bake for 35–40 minutes. If you prefer a golden crust, remove the lid during the last 5 minutes of cooking time.
- Using an instant-read thermometer, check for an internal temperature of about 190–200°F (88–93°C) to ensure the loaf is fully baked. If the loaf is underbaked, it may be gummy inside.
- Once baked, remove the loaf from the pan and let it cool completely on a wire rack before slicing. This ensures the texture stays light and fluffy. Cutting too soon can cause the loaf to dry out more quickly because of allowing the moisture to escape from the bread.


I just love your site and all the helpful information! Can you please tell me if you use the 9″ or the 13″ pullman pan? Thanks!
This is the exact one that I use: pullman pan
I want to make a wheat pullman loaf. How do I convert the wheat bread recipe for this pan? Do you have weighted measurements? Love all your recipes!
I would do just half wheat flour, half bread flour 🙂