If you love everything pumpkin during the fall months, you are going to love these homemade Potato Flake Sourdough Pumpkin Bagels! They’re soft and chewy, with just the right amount of pumpkin flavor, warm cinnamon, and pumpkin pie spice.
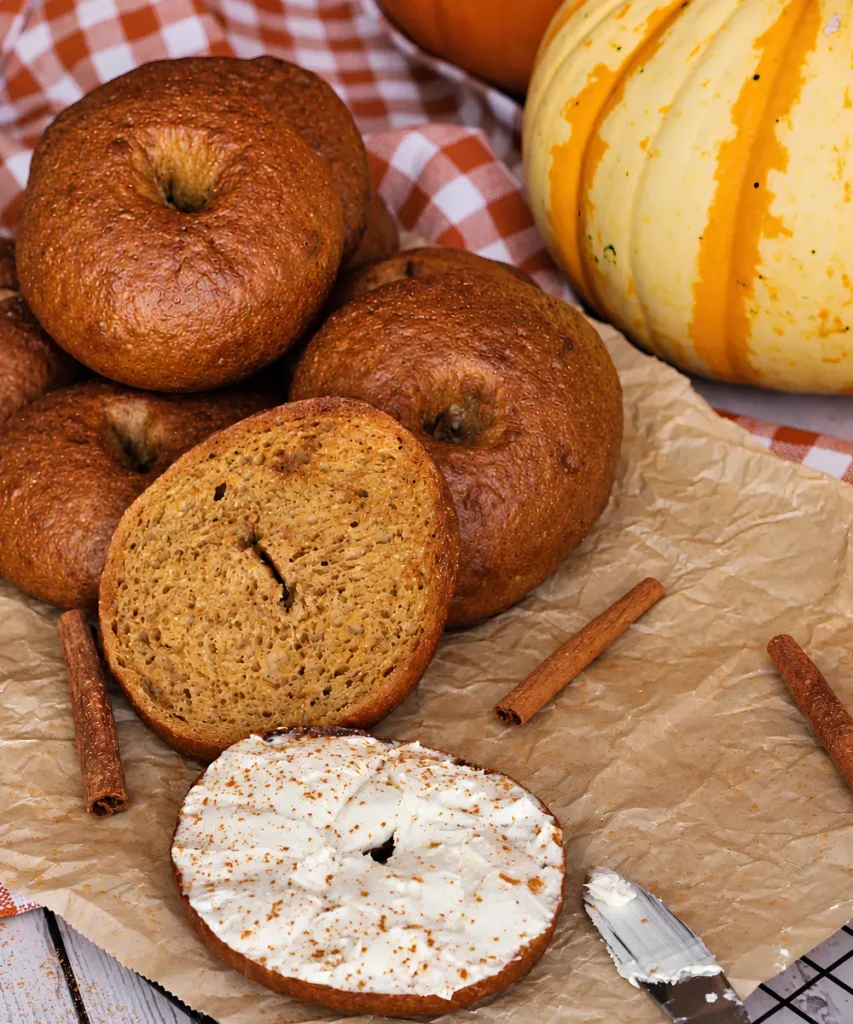
Made with active potato flake sourdough starter, real pumpkin puree, and a little brown sugar, these bagels are a delicious way to enjoy all those cozy fall flavors. And the best part? There’s no commercial yeast needed!
I love making homemade bagels because they really aren’t as complicated as they might seem. There are a few different steps involved, but most of the time is simply allowing the dough to ferment and rise.
These pumpkin bagels are delicious toasted with a little butter, plain cream cheese, or even a homemade cinnamon cream cheese spread. They make a wonderful fall breakfast and are great to make ahead for busy mornings!
Why You’ll Love These Potato Flake Sourdough Pumpkin Bagels
- Naturally leavened: These bagels are made using an active potato flake sourdough starter without adding commercial yeast.
- Perfect for fall: Pumpkin puree, cinnamon, and pumpkin pie spice give these bagels a delicious, warm flavor without being overly sweet.
- Soft and chewy: Boiling the bagels before baking helps create that classic bagel texture.
- Simple ingredients: You only need a handful of pantry staples, along with your potato flake sourdough starter and pumpkin puree.
- Great for meal prep: Make a batch, freeze any extras, and enjoy homemade pumpkin bagels whenever you’re ready!
What Is Potato Flake Sourdough?
If you’re new around here, you might be wondering what potato flake sourdough actually is.
Unlike traditional sourdough starters that are fed flour and water, potato flake sourdough starter is fed potato flakes, sugar, and water.
It is a naturally fermented starter containing wild yeast and bacteria that work together to help bread rise.
Potato flake sourdough is often associated with soft, slightly sweet sandwich-style breads, but it can be used for so much more! From cinnamon rolls and dinner rolls to pizza dough and even bagels, there are so many delicious things you can make with it.
For this pumpkin bagel recipe, you’ll want to make sure your starter is active and ready to use. A healthy, active starter is important for helping the dough rise properly.
Ingredients for Potato Flake Sourdough Pumpkin Bagels
One of the things I love about this recipe is that the ingredients are fairly simple.
For the Bagel Dough
- 1 cup active potato flake sourdough starter: This is what naturally leavens the bagels and gives them their delicious flavor.
- 4 cups (560 grams) all-purpose flour: All-purpose flour works well for creating a soft bagel with a pleasantly chewy texture.
- 1 teaspoon (8 grams) salt: Salt helps enhance the flavor and strengthen the dough.
- 2 teaspoons cinnamon: Adds a delicious, warm cinnamon flavor.
- 1 teaspoon pumpkin pie spice: Gives these bagels that classic fall spice flavor.
- 1/4 cup warm water: Helps bring the dough together. You don’t need hot water, just comfortably warm.
- 1 cup (256 grams) pumpkin puree: Be sure to use 100% pure pumpkin puree, NOT pumpkin pie filling. Pumpkin pie filling contains additional ingredients and sweeteners that will change the recipe.
- 2 tablespoons (28 grams) brown sugar: Adds just a little sweetness and complements the pumpkin and spices.
For Boiling the Bagels
- 12 cups water: For boiling the shaped bagels before baking.
- 1 tablespoon baking soda: Helps create that classic bagel exterior and encourages browning.
- 2 tablespoons brown sugar: Adds a little sweetness to the boiling water and helps with browning.
Tools Needed
Having the right tools on hand makes the process of making homemade bagels much easier!
This post may contain affiliate links, which means I may make a small commission at no extra cost to you. When you make a purchase through my link, you help me to keep Little Tennessee Home up and running! Thank you for your support! See my full disclosure here.
- Stand mixer with dough hook attachment: For mixing and kneading the bagel dough.
- Large mixing bowl: For fermenting the dough.
- Whisk: To evenly distribute the dry ingredients before adding the wet ingredients.
- Measuring cups and spoons: For measuring the ingredients.
- Kitchen scale: I highly recommend weighing your flour and other ingredients when possible for more consistent results.
- Bench scraper or dough scraper: Makes dividing the dough into equal portions much easier.
- Baking sheet: For the shaped bagels to rise and bake.
- Parchment paper: You’ll need individual parchment squares for the second rise and a sheet to line your baking pan.
- Plastic wrap: To cover the dough during fermentation and rising.
- Large Dutch oven or stockpot: For boiling the bagels.
- Slotted spoon: For carefully removing the bagels from the boiling water without damaging their shape.
How to Make Potato Flake Sourdough Pumpkin Bagels
Making homemade bagels involves mixing, fermenting, shaping, rising, boiling, and baking. Don’t let all those steps intimidate you! Each step is fairly simple, and I’ll walk you through the entire process.
Be sure to check out the FREE printable recipe card at the bottom of the page!
Mix the Dough
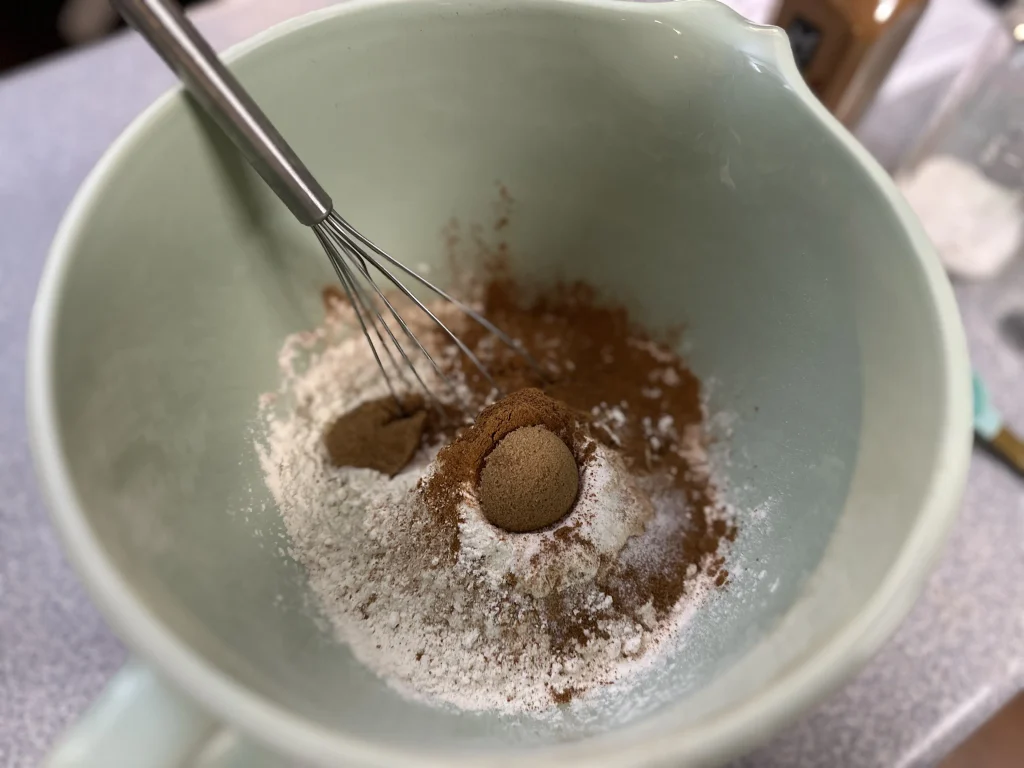
In the bowl of a stand mixer, add the all-purpose flour, salt, cinnamon, pumpkin pie spice, and brown sugar.
Use a whisk to thoroughly combine the dry ingredients. This helps ensure the spices and salt are evenly distributed throughout the dough.
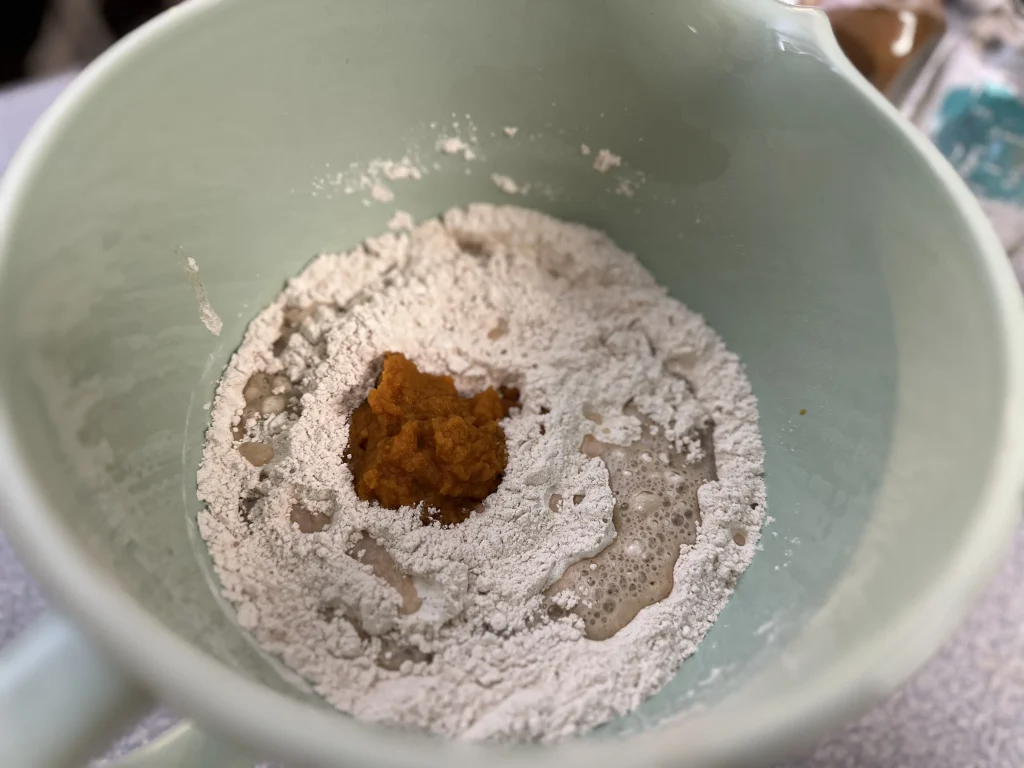
Next, add the active potato flake sourdough starter, warm water, and pumpkin puree.
Using the dough hook attachment, begin mixing on low speed until all the ingredients are combined.
Once everything has come together, increase the mixer to medium speed and knead for approximately 5–10 minutes.
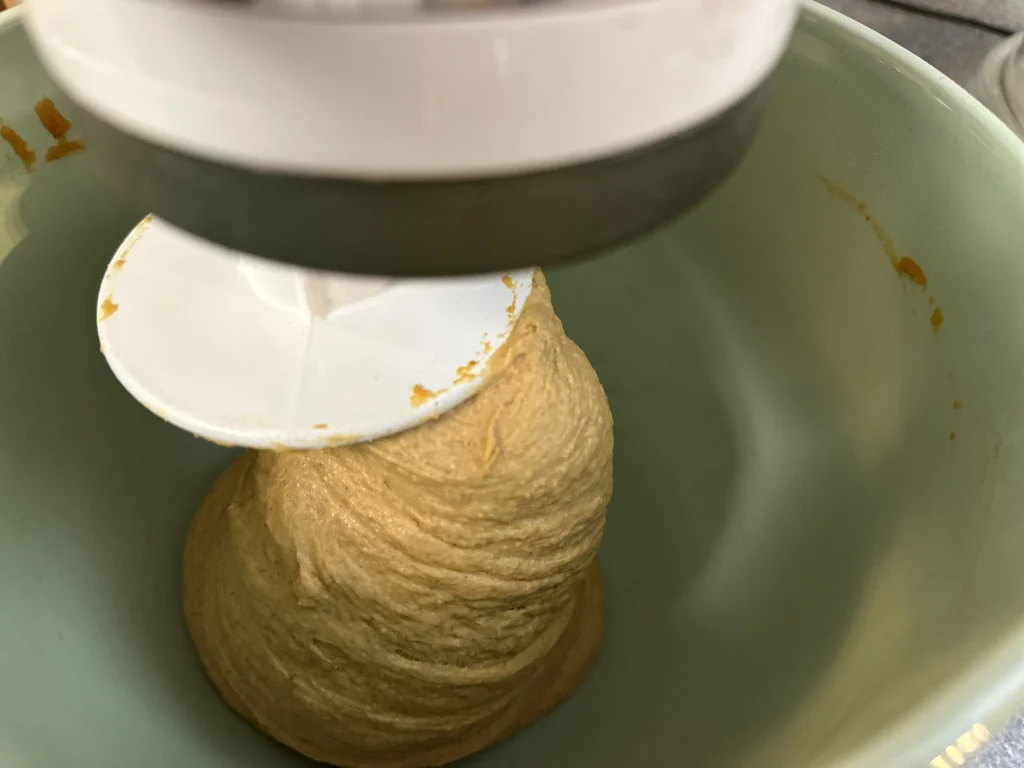
You’re looking for a dough that begins pulling away cleanly from the sides of the mixing bowl but still sticks slightly to the bottom.
Helpful Tip: Pumpkin puree adds quite a bit of moisture to the dough, so don’t expect it to look exactly like a traditional bagel dough. The dough should come together and become smoother as you knead it, but it may still have a slightly tacky feel.
Allow the Dough to Ferment
Remove the dough from the stand mixer and place it into a large bowl.
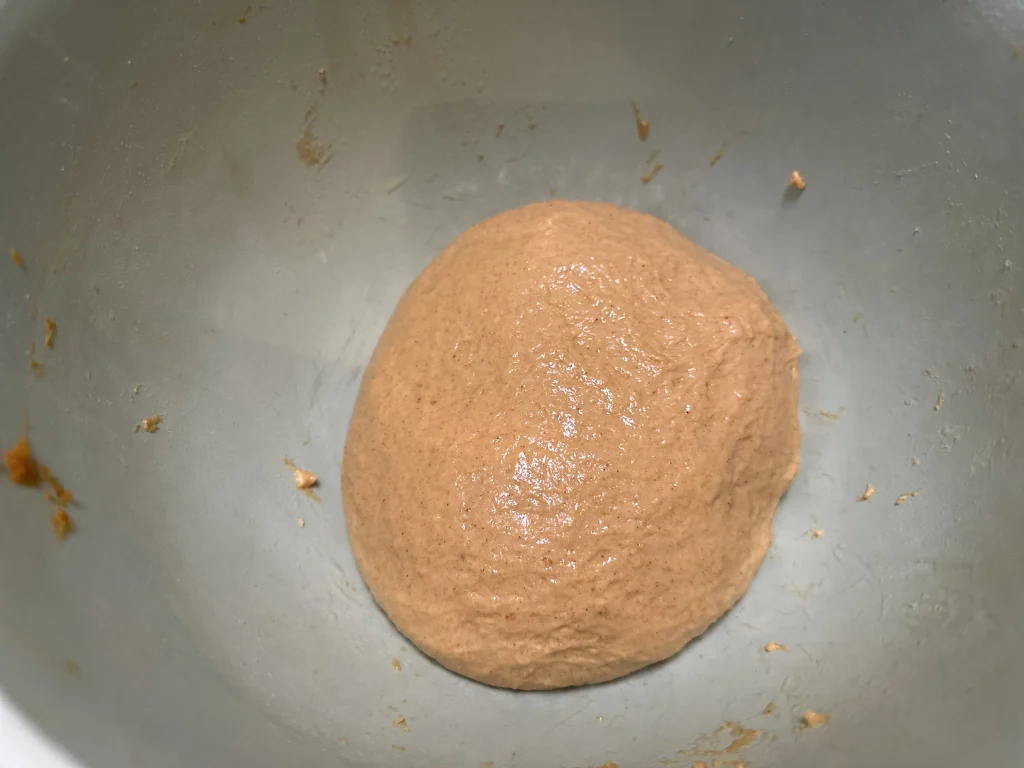
Lightly oil the bowl and the top of the dough to help prevent it from drying out during fermentation.
Cover the bowl with plastic wrap and leave it at room temperature until the dough has doubled in size.
This will typically take approximately 6–10 hours, depending on the temperature of your home and the strength of your starter.
Keep in mind that sourdough fermentation isn’t always on an exact schedule.
During warmer months, your dough may rise much faster than it does during cooler months. A strong, active starter will also help the dough ferment more quickly.
Rather than watching the clock, pay attention to the dough itself. You’re looking for a noticeable increase in volume, approximately double its original size.
Divide and Shape the Bagels
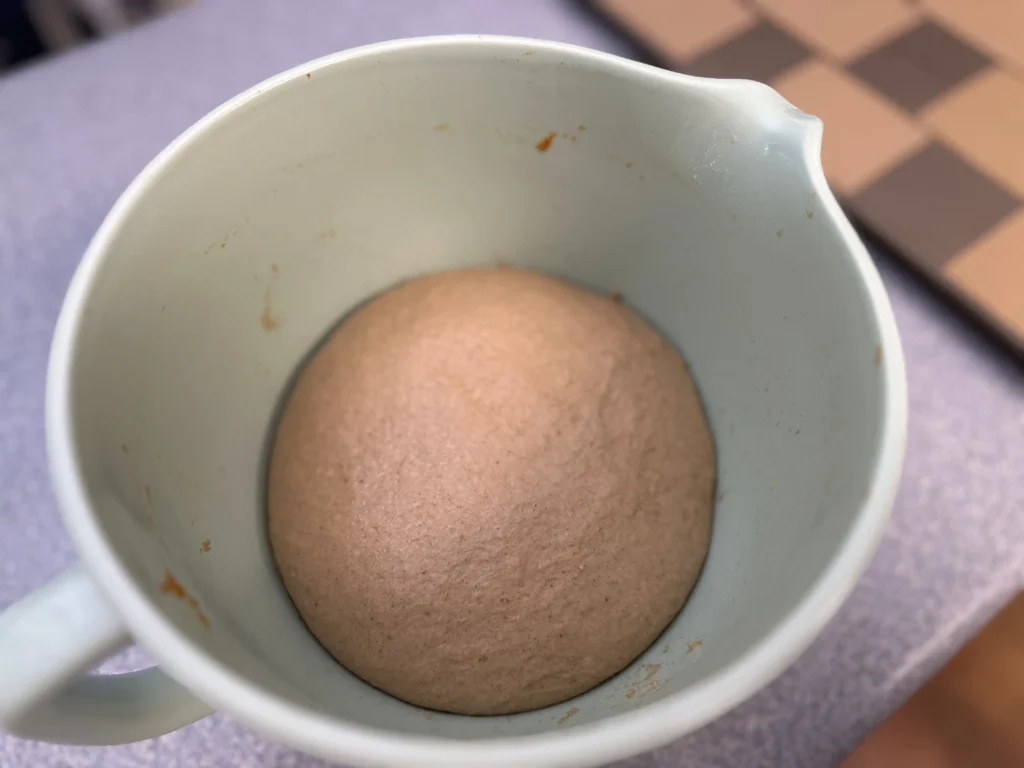
Once the dough has doubled, gently remove it from the bowl and place it onto a clean work surface.
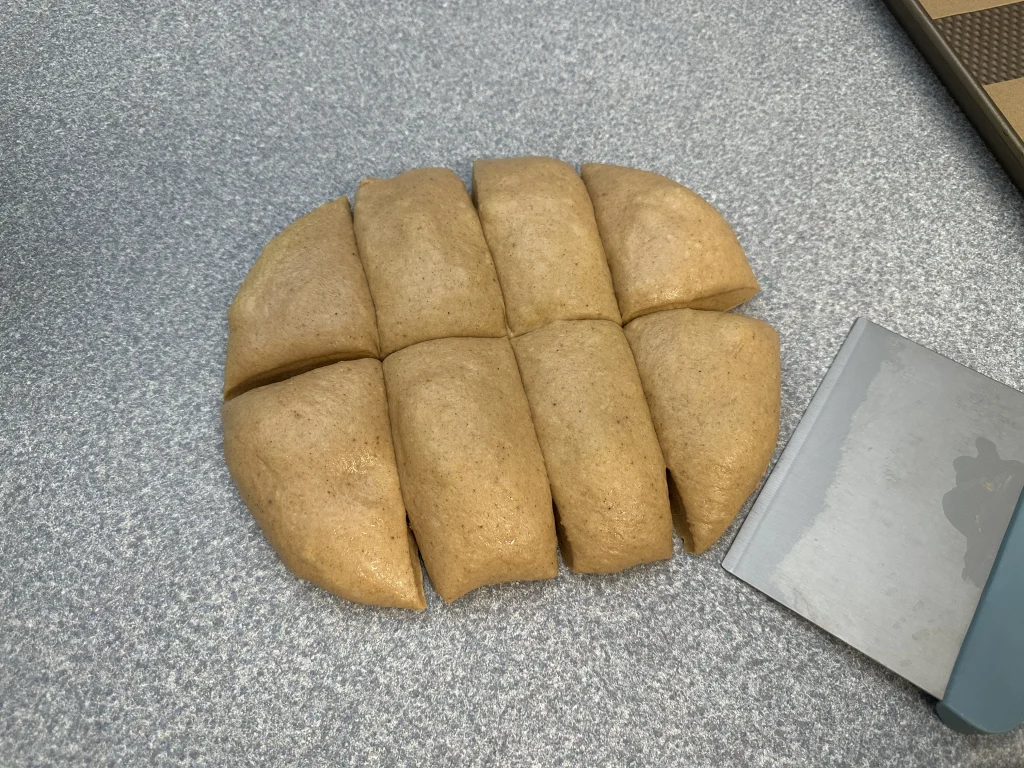
Using a bench scraper, divide the dough into 8 equal portions.
Take one portion of dough and begin shaping it into a smooth ball.
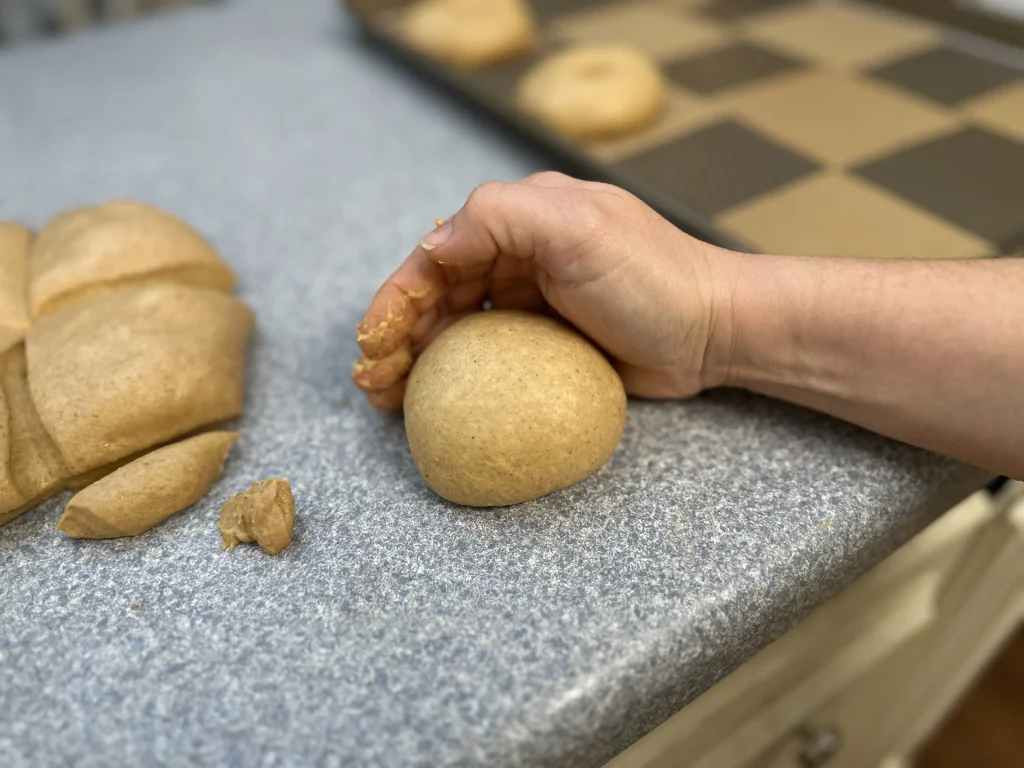
To do this, use the counter to create a little resistance as you pull the dough toward yourself. This helps create surface tension on the outside of the dough, giving you a nice, smooth ball.
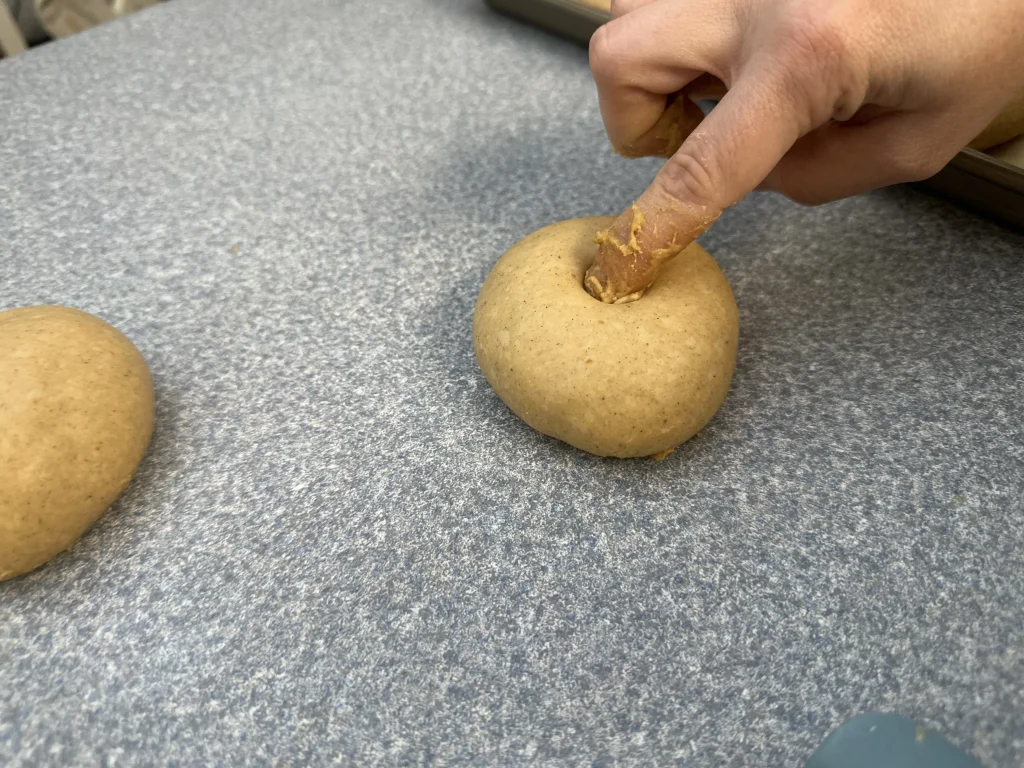
Once you’ve shaped the dough into a ball, use your finger to poke a hole directly through the center.
Gently stretch the opening using your fingers. You can even place your index fingers inside the hole and gently spin the dough around them to help stretch it evenly.
You’ll want to make the hole fairly noticeable, since the dough will continue expanding as it rises and bakes.
Repeat this process with the remaining portions of dough.
Allow the Bagels to Rise Again
Cut parchment paper into individual squares, making one square for each bagel.
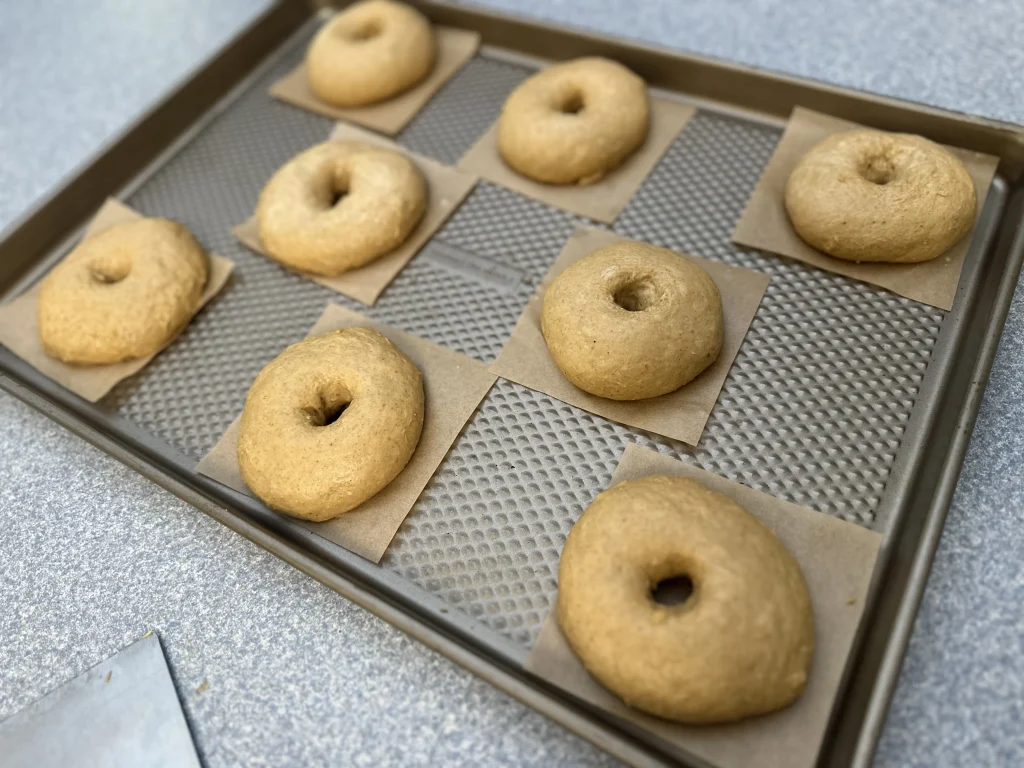
Place each shaped bagel onto its own piece of parchment paper and arrange them on a baking sheet.
Cover the bagels loosely with plastic wrap and allow them to rise at room temperature until they become soft and puffy.
This second rise typically takes approximately 1–2 hours.
Be careful not to overproof your bagels!
This is one of the most important things to watch for when making homemade sourdough bagels.
You want the dough to become noticeably puffy, but you don’t want it to rise so much that it begins losing its structure.
Overproofed bagels can collapse when they’re transferred into the boiling water, leaving you with flat bagels instead of nice, rounded ones.
Keep an eye on the dough during this second rise, and don’t feel like you have to wait the full two hours if your bagels are already looking ready.
Prepare the Boiling Water
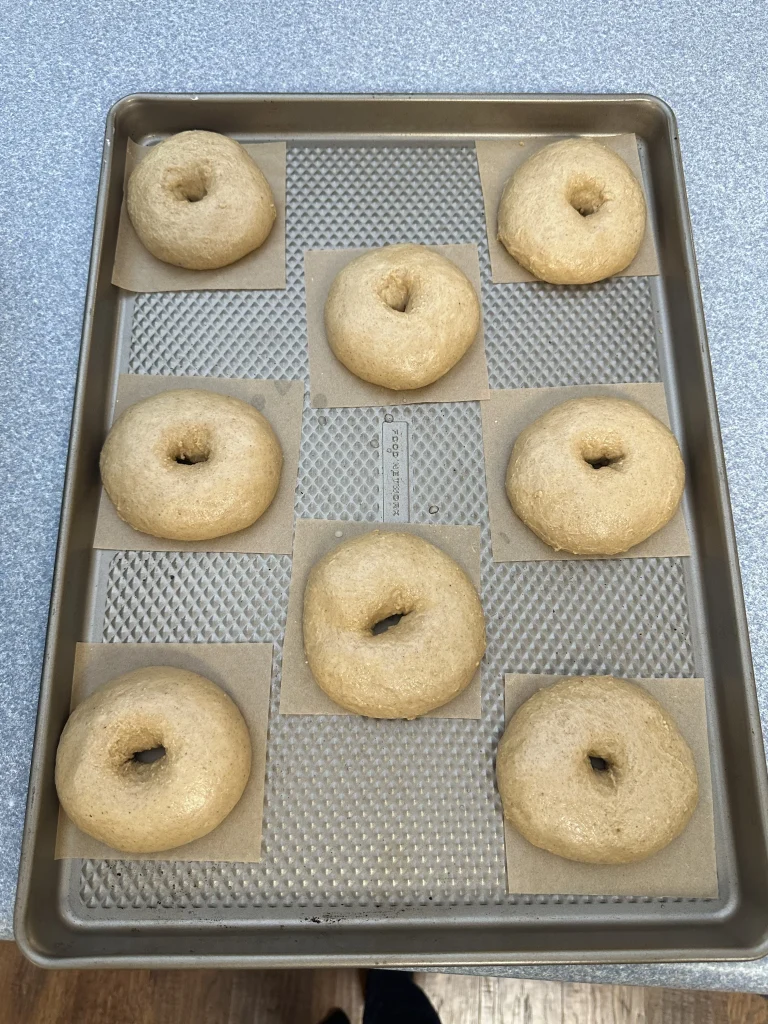
Once your bagels have become soft and puffy, preheat your oven to 450°F.
Fill a large Dutch oven or stockpot with 12 cups of water and bring it to a gentle boil.
Carefully add the baking soda and brown sugar to the water.
You may notice a little bubbling when the baking soda is added, so be sure to use a pot large enough to allow plenty of room.
Stir gently to dissolve the ingredients.
Boil the Bagels
Now it’s time for the step that makes bagels, well, bagels!
Carefully pick up one of your shaped bagels using the individual parchment square underneath it.
Lower the bagel into the gently boiling water, parchment paper and all.
As soon as the parchment paper comes in contact with the water, it should release from the dough fairly easily.
This is one of my favorite little tricks for making homemade bagels!
Instead of trying to pick up the soft dough with your hands and risk deflating it, the parchment paper helps you transfer the bagels into the water while keeping their shape intact.
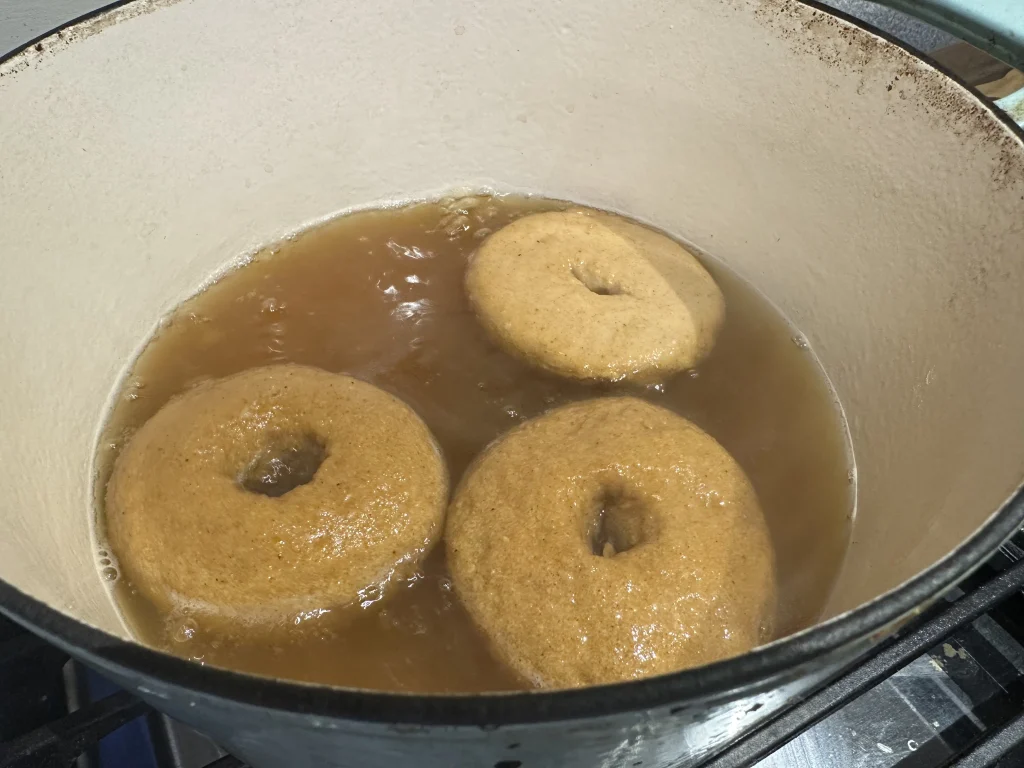
Carefully remove the parchment paper once it releases.
Use the chop stick or something similar to stick into the bagel hole and spin the bagel around a few times. This helps prevent the hole from closing up all of the way.
Boil the bagels for 1 minute on each side, working with only a few bagels at a time so you don’t overcrowd the pot.
Use a slotted spoon to gently flip the bagels halfway through boiling.
Once both sides have been boiled, carefully remove the bagels using your slotted spoon and place them onto a parchment-lined baking sheet.
Repeat until all eight bagels have been boiled.
Bake the Pumpkin Bagels
Once all the bagels have been boiled, transfer the baking sheet to your preheated oven.
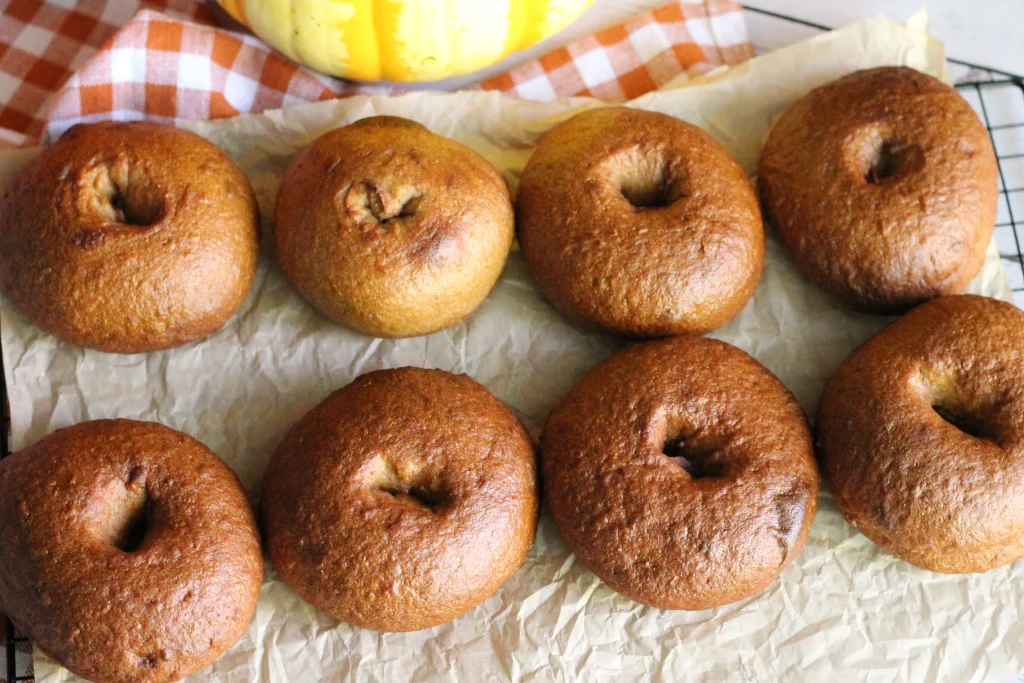
Bake at 450°F for approximately 10–12 minutes, or until the bagels are a deep golden brown and baked through.
Keep in mind that the pumpkin puree and spices will naturally give the dough a darker color than plain bagels, so you’ll want to look for that beautiful golden-brown exterior.
Remove the bagels from the oven and allow them to cool before slicing.
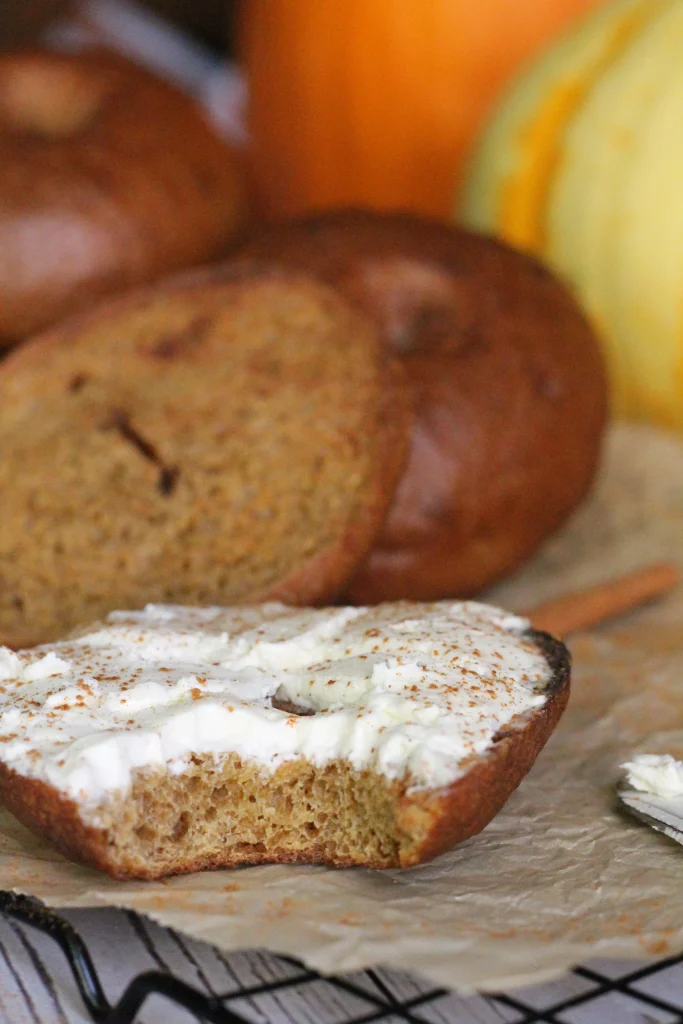
Enjoy them fresh, toasted with butter, or topped with your favorite cream cheese!
Why Do You Boil Bagels Before Baking?
If you’ve never made homemade bagels before, you may be wondering why you have to boil the dough before baking it.
This is actually one of the things that makes a bagel different from regular bread!
When the shaped dough is placed into boiling water, the outside of the bagel begins to set before it goes into the oven.
This helps create the chewy outer texture that bagels are known for.
Boiling also helps limit how much the bagels expand in the oven, allowing them to maintain their traditional rounded shape rather than puffing up like dinner rolls.
The baking soda in the boiling water encourages browning, while the brown sugar adds a little sweetness and contributes to that beautiful golden exterior.
Don’t skip the boiling step! It’s essential for getting that classic bagel texture.
Helpful Tips for Making the Best Pumpkin Sourdough Bagels
Use an Active Starter
A healthy, active potato flake sourdough starter is especially important when making bagels.
Because this recipe doesn’t use commercial yeast, the starter is responsible for helping the dough rise.
If your starter has been sitting in the refrigerator for a while and isn’t very active, you may want to give it a fresh feeding and allow it to become active before using it.
Use Pure Pumpkin Puree
Make sure you’re using 100% pure pumpkin puree rather than pumpkin pie filling.
They may look very similar on the grocery store shelf, but they are not the same thing!
Pumpkin pie filling typically contains added sugar and spices, which can affect both the flavor and consistency of your dough.
Don’t Add Too Much Extra Flour
Bagel dough should have some structure, but it shouldn’t be so dry that it becomes difficult to work with.
Since this dough contains pumpkin puree, it may feel a little different from traditional bagel dough.
Give the stand mixer enough time to knead the dough before deciding that it needs more flour.
Don’t Rush the First Fermentation
Allowing your dough to properly ferment is important for both flavor and texture.
The 6–10 hour fermentation window is simply a guideline.
A cooler kitchen may require more time, while a warmer kitchen may speed things up considerably.
Watch for the dough to double rather than relying entirely on the clock.
Don’t Overproof During the Second Rise
Unlike the first fermentation, where you’re looking for the dough to double, the second rise is simply about allowing the shaped bagels to become soft and puffy.
They don’t need to double again.
Letting them rise too long may cause the dough to become weak and collapse during boiling.
Use Individual Parchment Squares
This little trick makes a huge difference!
Because the shaped bagels are delicate after their second rise, handling them too much can cause them to deflate.
Placing each bagel on its own piece of parchment paper allows you to lower it directly into the boiling water without disturbing its shape.
Avoid Overcrowding the Pot
Boil only a few bagels at a time.
You want enough room to comfortably flip each bagel without them sticking together or becoming misshapen.
What to Serve with Pumpkin Sourdough Bagels
These pumpkin bagels have a mild sweetness and warm spice flavor, making them delicious with all kinds of spreads.
Some of my favorite ideas include:
- Softened salted butter
- Plain cream cheese
- Cinnamon cream cheese
- Honey butter
- Maple cream cheese
- Apple butter
- A drizzle of honey
You can also toast your bagel before adding your favorite spread for a slightly crisp outside and soft, chewy center.
How to Store Homemade Pumpkin Bagels
Homemade bagels don’t contain the preservatives commonly found in store-bought bagels, so proper storage is important for keeping them fresh.
Allow the bagels to cool completely before placing them into an airtight container or storage bag.
At Room Temperature: Store in an airtight container for approximately 1–2 days.
In the Freezer: For longer storage, wrap the cooled bagels individually or place them in a freezer-safe bag. Freeze for up to 3 months for the best quality.
I especially like the idea of slicing the bagels before freezing them. That way, you can pull one out of the freezer and toast it whenever you’re ready for breakfast!
Frequently Asked Questions
Can I Use Canned Pumpkin Puree?
Absolutely! Canned pumpkin puree works well for this recipe.
Just make sure you’re using 100% pure pumpkin and not pumpkin pie filling.
Can I Make These Bagels Without Commercial Yeast?
Yes! These bagels are made entirely with active potato flake sourdough starter as the leavening agent.
You don’t need to add any commercial yeast.
Why Did My Bagels Turn Out Flat?
One common reason homemade sourdough bagels turn out flat is overproofing during the second rise.
If the dough rises for too long, it can lose its strength and collapse when moved or boiled.
Be sure to boil your bagels once they have become soft and puffy rather than waiting for them to double in size again.
Why Aren’t My Bagels Rising?
If your bagel dough isn’t rising, the first thing to consider is the activity of your sourdough starter.
A sluggish starter may require additional time to ferment the dough.
The temperature of your home can also make a big difference. Cooler temperatures slow down fermentation, so your dough may simply need more time.
Do I Have to Boil the Bagels?
For the best bagel texture, yes!
Boiling is what helps create that characteristic chewy exterior.
Skipping this step will result in something more similar to a traditional bread roll rather than a bagel.
Can I Freeze These Pumpkin Bagels?
Yes! These bagels are great for freezing.
Allow them to cool completely, slice them if desired, and store them in a freezer-safe bag or container.
When you’re ready to enjoy one, simply thaw and toast it.
Potato Flake Sourdough Pumpkin Bagels
Ingredients
Bagel Dough
- 1 cup active potato flake sourdough starter
- 4 cups 560 grams all-purpose flour
- 1 teaspoon 8 grams salt
- 2 teaspoons cinnamon
- 1 teaspoon pumpkin pie spice
- 1/4 cup warm water
- 1 cup 256 grams pumpkin puree (NOT pumpkin pie filling)
- 2 tablespoons 28 grams brown sugar
For Boiling
- 12 cups water
- 1 tablespoon baking soda
- 2 tablespoons brown sugar
Instructions
- Combine dry ingredients. In the bowl of a stand mixer, add the flour, salt, cinnamon, pumpkin pie spice, and brown sugar. Whisk until thoroughly combined.
- Add wet ingredients. Add the active potato flake sourdough starter, warm water, and pumpkin puree.
- Knead the dough. Using the dough hook attachment, mix on low speed until the ingredients are combined. Increase to medium speed and knead for 5–10 minutes, until the dough pulls cleanly away from the sides of the bowl but still sticks to the bottom.
- First fermentation. Remove the dough from the mixer and transfer it to a lightly oiled bowl. Lightly oil the top of the dough to prevent drying. Cover with plastic wrap and ferment at room temperature until doubled in size, approximately 6–10 hours, depending on room temperature and starter strength.
- Divide the dough. Once doubled, remove the dough from the bowl and place it onto a clean work surface. Use a bench scraper to divide it into 8 equal portions.
- Shape the bagels. Roll each portion into a smooth ball, using the counter to create surface tension. Poke a hole through the center of each ball and gently stretch the opening using your fingers. Spin the dough around your index fingers to widen the hole evenly.
- Second rise. Place each bagel on an individual square of parchment paper and arrange them on a baking sheet. Cover loosely with plastic wrap and allow them to rise until soft and puffy, approximately 1–2 hours. Do not overproof.
- Prepare the boiling water. Once the bagels are puffy, preheat the oven to 450°F. Bring 12 cups of water to a gentle boil in a large Dutch oven or stockpot. Add the baking soda and brown sugar.
- Boil the bagels. Using the individual parchment squares, carefully transfer a few bagels at a time into the boiling water. Allow the parchment paper to release from the dough and remove it. Use the chop stick or something similar to stick into the bagel hole and spin the bagel around a few times. This helps prevent the hole from closing up all of the way. Boil the bagels for 1 minute per side.
- Transfer to baking sheet. Using a slotted spoon, remove each boiled bagel and place it onto a parchment-lined baking sheet.
- Bake. Once all bagels have been boiled, bake at 450°F for 10–12 minutes, or until deep golden brown and baked through.
- Cool and enjoy. Remove from the oven and allow the bagels to cool before slicing. Serve with butter, cream cheese, or your favorite spread.