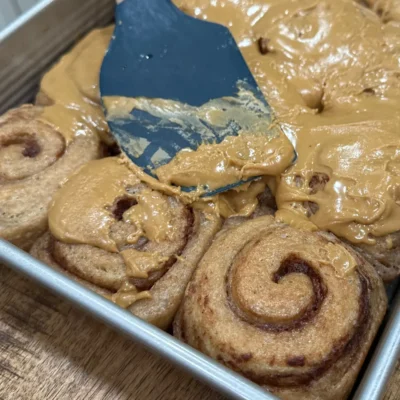
Potato Flake Sourdough Cinnamon Rolls (Freshly Milled Flour)
If you are looking for the best cinnamon rolls made with a potato flake starter AND freshly milled flour, you're in the right place. They’re hearty yet soft, deeply flavorful, and have that old-fashioned bakery feel that store-bought flour just can’t replicate.
Equipment
- Grain Mill
- Stand mixer with dough hook attachment or a large bowl and wooden spoon
- measuring cups and spoons
- Kitchen scale
- Dough scraper
- Rolling Pin
- Plastic Wrap or Beeswax Wrap
- 9x13 baking dish
Ingredients
Dough
- 3 cups freshly milled flour Total: 422 grams
- 1 ¼ cups hard white wheat 176 g
- 1 ¼ cups hard red wheat 176 g
- ½ cup soft white wheat 70 g
- ½ cup active potato flake sourdough starter 126 grams
- ¼ cup coconut oil 48 grams
- 2 tablespoons vital wheat gluten 18 grams
- ¼ cup sugar 49 grams
- 1 cup warm water 218 grams
- ½ tablespoon salt
Filling
- ½ –¾ cup sugar
- ½ cup butter
- 2 tablespoons cinnamon add more if desired
Icing
- 2 cups powdered sugar
- ½ teaspoon maple extract
- 2 tablespoons milk
- 2 tablespoons espresso or strong brewed coffee
For Baking
- ½ cup heavy cream poured over rolls before baking
Instructions
- Start by giving your potato flake sourdough starter a quick stir, then measure out 1/2 cup. Add it to the bowl of a stand mixer along with the 1 cup of warm water, coconut oil, sugar, vital wheat gluten, and all of the freshly milled flour. Do not add the salt yet.
- Mix just until everything is combined and no dry flour remains. There’s no need to knead at this stage—this is simply about hydration.
- Cover the bowl with plastic wrap or beeswax wrap and let the dough rest for 30 minutes. This rest period is called the autolyse. It allows freshly milled flour time to fully absorb the liquid and begin developing gluten naturally.
- After the autolyse, sprinkle the salt over the dough. Using the dough hook, knead on low to medium speed for about 5 minutes.
- The dough should form a soft, stretchy dough ball. It will feel slightly tacky but should not heavily stick to your hands. Freshly milled dough often feels different than white flour dough—trust the texture.
- With lightly oiled hands, remove the dough from the bowl and shape it into a ball. Lightly oil the bowl, return the dough, and cover again.
- Allow the dough to rise in a warm place until doubled in size, about 5–10 hours depending on the temperature of your home and how active your starter is. This long rise is where flavor and structure develop.
- Once doubled, use a dough scraper to gently loosen the dough from the bowl and turn it out onto a clean work surface.
- Try not to add extra flour unless absolutely necessary. Any flour added at this stage won’t be fermented and can affect the final texture.
- Before rolling, gently press the dough into a rectangle to get it close to the shape you want, then roll it out into a large rectangle about ¼ inch thick.
- Melt the butter. Reserve about 1 teaspoon of butter in the melting container. Use it to brush the inside of your 9×13 baking dish. (you can also line your dish with parchment paper)
- Brush the remaining melted butter evenly over the surface of the dough, going all the way to the edges except one long edge. Leaving this edge bare helps the roll seal properly.
- Sprinkle the sugar evenly over the butter, followed by the cinnamon. The butter should soak up the sugar—you don’t want lots of loose sugar or overly runny butter that will squeeze out when rolling.
- Starting from the buttered long edge, roll the dough up as tightly as possible toward the unbuttered edge. If the dough is sticking to the work surface, use a bench scraper to help loosen the dough as you roll it. When you reach the end, pull it snug and pinch to seal.
- For perfectly shaped rolls, cut using thread or unflavored dental floss. A very sharp knife will also work—just be careful not to squish the dough.
- Place the rolls into the prepared baking dish.
- Cover the pan with plastic wrap and allow the cinnamon rolls to rise again for 5–10 hours, or until doubled in size. Final rise time will depend on the temperature of your home.
- Once risen, pour about ½ cup of heavy cream over the cinnamon rolls, letting it pool around and between them. This step is optional—but it creates an incredibly gooey, moist cinnamon roll and is highly recommended.
- Bake in a 350°F oven for 25–30 minutes, or until the inside of a center roll reaches 190°F.
- While the cinnamon rolls bake, whisk together the powdered sugar, milk, espresso, and maple extract until smooth and thick. Add additional milk if needed to reach your desired consistency.
- Once the rolls are baked, allow them to cool slightly, then generously spread or pour the icing over the top. Serve warm and enjoy.
Notes
Vital wheat gluten is essential in this recipe. It provides structure and helps achieve soft rolls when working with 100% whole grain, freshly milled flour.
Use oiled hands when shaping the dough to prevent sticking.
Avoid over-proofing the first rise. If the dough ferments too long initially, the second rise may suffer.
Do not skip the autolyse. Freshly milled flour takes longer to hydrate and this step is crucial for soft, well-developed dough.