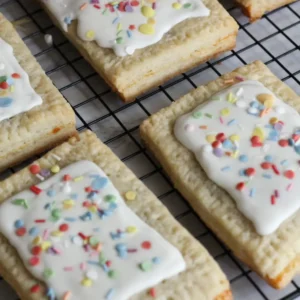
Potato flake sourdough strawberry pop tarts
Potato flake sourdough strawberry pop tarts - the buttery, flaky crust we all love, filled with sweet strawberry jam, and topped with a simple icing and plenty of dye free sprinkles.
Equipment
- Large mixing bowl – for making the dough
- Whisk – to mix dry ingredients evenly
- Cheese grater – my favorite trick for working cold butter into flour quickly
- Fork – for mixing the starter into the dough
- Plastic wrap – to keep your dough snug in the fridge
- Rolling pin – using one with thickness rings really helps ensure even thickness.
- Dough scraper or bench scraper – keeps your edges neat and makes shaping easier
- Ruler – for scoring perfectly sized pop tarts
- Parchment paper – no sticking, no mess
- Baking sheet – a cookie sheet works great
- Pizza cutter or sharp knife – for cutting the pop tarts apart
- Fork or pastry crimper – for sealing the edges
- Small and medium bowls – for separating eggs and making icing
- Pastry brush – to brush the egg yolk around the filling
- Pastry bag or zip-top bag – to pipe the icing neatly
- Toothpick – for spreading icing into the corners
Ingredients
Pastry Dough
- 2½ cups 313 g all-purpose flour
- 4 tsp. 18 g granulated sugar
- ½ tsp. salt 2 g
- 1¼ cups 2½ sticks chilled salted butter
- ⅔ cup + 1 tsp. 150 mL cold potato flake sourdough starter (active or discard)
Filling
- 1/2-3/4 cup Thick strawberry jam store-bought or homemade — I use homemade strawberry jam
Assembly
- All-purpose flour for work surface
- 1 large egg yolk reserve the white for icing
- Dye-free sprinkles
Icing
- 1 large egg white
- Pinch of kosher salt
- 2 cups 227 g powdered sugar
- ½ tsp. fresh lemon juice
- ½ tsp. vanilla extract
Instructions
Make the Pastry Dough
- In a large bowl, whisk together the flour, sugar, and salt. Grab that cold butter straight from the fridge and grate it right into the flour — this is the easiest way to keep those little buttery bits that make pastry so flaky.
- Toss the butter into the flour so it’s coated, then work it in with your fingers until the biggest pieces are about the size of a lentil.
- Using a fork, drizzle in the cold potato flake starter while tossing constantly. Then gently bring the dough together with your hands.
- It’s a dry dough, so it may look a little crumbly, but it should hold together when pressed.
- Pat it into a ½-inch thick rectangle, wrap tightly in a piece of plastic wrap (squeezing out any air), and pop it in the fridge for at least 2 hours — or up to 36 hours if you want that long-fermented flavor and easier digestion.
Roll Out the Dough
- Preheat your oven to 300°F. Line a baking sheet with parchment paper.
- Cut your chilled dough in half. Return one half to the fridge while you work with the other.
- Place the dough on a lightly floured work surface your work surface and roll the dough into a 14 x 9-inch rectangle. Transfer to your baking sheet.
- Want a thinner crust? Roll to a 17½ x 9-inch rectangle instead and make 10 pop tarts instead of 8.
- My favorite rolling trick: To me, the best way to create an "almost" perfect rectangle is to start out with a rectangle before you every begin rolling. To do this, use a dough cutter to cut the flat piece of dough into a rectangle, squaring off the edges. Add the trimmings that are cut off back on top of the dough as evenly as possible. Then begin to roll it out from here, aiming to keep the crisp rectangle shape.
Score & Chill
- Use a ruler to lightly score a 2x4 rectangle grid — you’ll have 8 rectangles about 4½ x 3½ inches each. Don’t cut all the way through. Chill for 10–15 minutes so the dough firms up.
- While that chills, roll out the second half of dough the same way and prick it all over with a fork or pizza docker — this keeps it from puffing too much in the oven.
Fill & Assemble
- Remove scored dough from refrigerator and spoon strawberry jam on the rectangles (about a heaping tablespoonful each). Spread filling in an even layer so it fills up the rectangle leave about ¼” border of exposed dough on all edges.
- Separate 1 large egg, placing egg yolk into small bowl and egg white into medium bowl. Beat egg yolk to blend.
- Brush egg yolk over pastry in the borders left exposed, working around filling. This is your glue, so don't skip this step.
- Drape second piece of pastry over the top, aligning the slabs and gently pressing out any air pockets. Press firmly around the filling to seal the pastry (take care to avoid smooshing the filling too much.)
- Using a pizza cutter, cut the pop tarts apart between the rectangles.
- Gently separate them and space the poptarts on the parchment lined cookie sheet. Use a fork to crimp the edges by pressing down along the edges of the pop tart. Let the dough chill in the fridge until pastry is firm, about 10–15 minutes.
Bake Strawberry Pop Tarts
- Bake for 30–35 minutes, until the bottoms are golden and the tops are puffed but still pale. Let them cool completely before icing.
Make the Icing
- Add 1 pinch of kosher salt to reserved egg white and whisk until foamy. Add lemon juice and vanilla. Add 2 cups powdered sugar a little bit at a time, whisking constantly and vigorously until you have a smooth, opaque white icing that falls off the whisk in a slowly dissolving ribbon (depending on the size of your egg white, you might not need all the sugar).
- Fill a disposable pastry bag or a resealable plastic bag with icing and snip a very small opening from the end or a bottom corner. Pipe thin, even rectangle outlines of icing on the top of each pop tart, leaving about ¼" border.
- Working with one Pop-Tart at a time, pipe icing inside the icing rectangles and use a toothpick to cover entire icing rectangle in a thin, even layer (add more icing if needed). You should have a smooth, even application of white icing. Before the icing starts to set, top pastries generously with sprinkles. Let sit at room temperature at least 1 hour to let the icing set before serving.
Notes
I HIGHLY recommend checking out the full blog post with photos as a reference guide until you have made these once or twice and have the basics down.
Cold butter = flaky layers — if your butter starts to warm, chill the dough. This is probably the most important to achieve that flaky pastry.
Work quickly to keep everything cold and easy to handle. Try not to leave ingredients lying around, or walk off before completing the steps.
Thick filling- Making sure that your jam is thick will help prevents leaks.
Chill often — before cutting, before baking — cold pastry puffs and bakes beautifully. Keeping it cold really is important.
Refrigerate your starter-before making the dough, if your starter is room temperature, move it to the fridge to make sure it is cold.